
A used 2000s sportbike can wear attractive new plastics while hiding a very different history: shortened tail brackets, a substituted headlight, a patched harness or missing OEM trim. Calling the project a “reversible restomod” does not make those changes disappear. A new painted fairing set may reverse an appearance choice. It cannot uncut a frame, recreate an undocumented bracket or certify wiring.
This guide is for the rider who already owns a modified older bike and wants to know what a return-to-stock project would actually involve. It is not a period-correct color guide, a generic restoration audit or a promise of collector value. The useful output is a ledger separating what is original and intact, what can be exchanged without permanent work, what requires technical restoration, and what remains unknown.
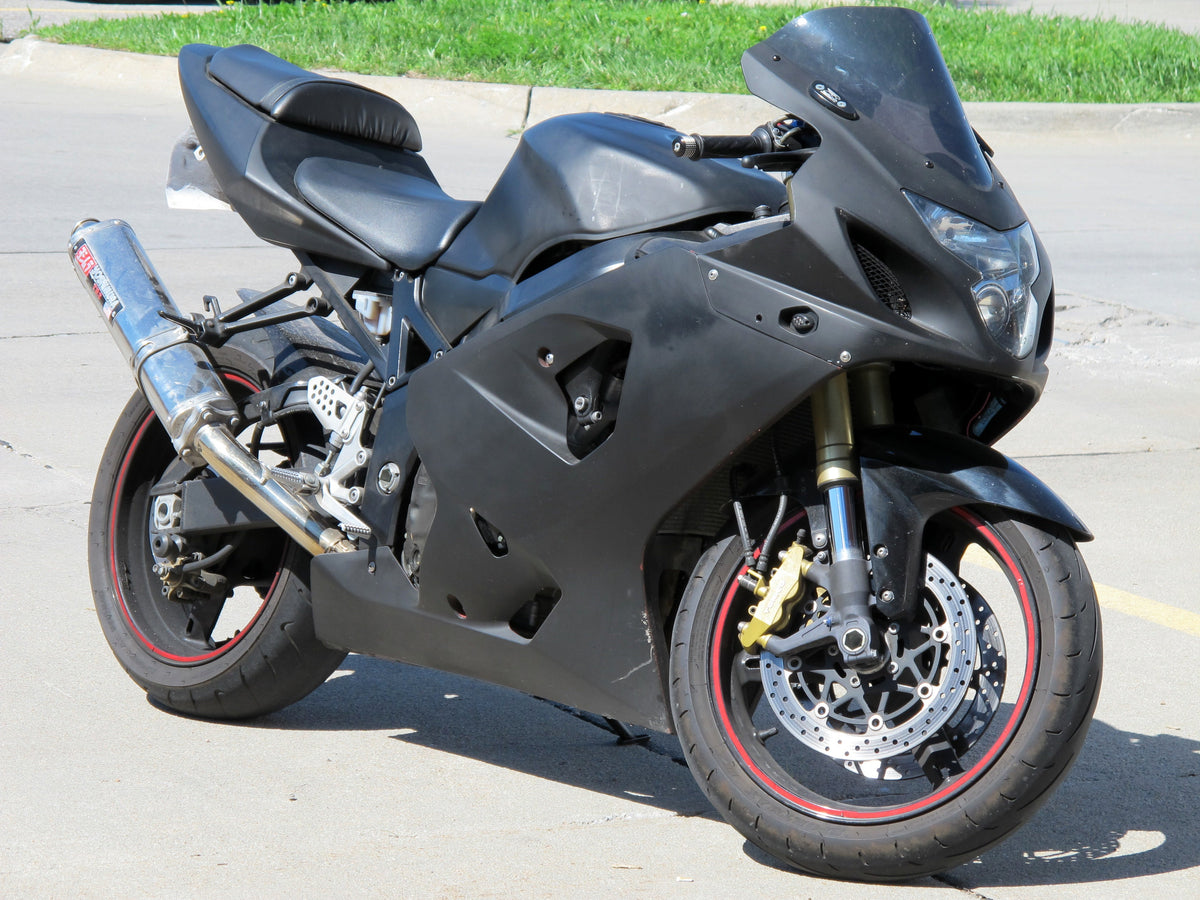
Editorial photo: a real customized Suzuki GSX-R 750 photographed by Hanyou23, via Wikimedia Commons, CC BY-SA 4.0; resized by the site for display. The exact model year and modification history are not established by the image. It is an editorial example, not a NiceFairings product or a documented return-to-stock project.
Define “reversible” before choosing a design
Use four layers. Appearance covers colors, graphics and the visible panel set. Bodywork interfaces cover tabs, stays, screens, mirrors, rubber mounts, heat protection and hardware. Electrical and mechanical systems cover lighting, controls, exhaust routing and associated brackets. Permanent structure covers any cut, weld, drilled frame part or altered subframe. A project can be reversible at one layer and not another. Do not reduce all four to a single yes/no badge.
Ask what the owner actually wants: a personal street bike that can wear its original panels again, a faithful-looking restoration that documents reproduction parts honestly, or a genuine attempt to restore factory configuration. Those are different objectives. A new kit can serve the first two if fitment and scope are confirmed. The third may require scarce original components, verified service information and qualified repair work outside a bodywork supplier's role.
Start with the bike as found, not as imagined
Photograph both sides, front, rear and cockpit in neutral light. Record the VIN and exact model/year privately. Photograph every visible fairing seam, headlight opening, tail support, mirror base, fastener stack and any aftermarket component. Keep the original photographs before removing parts. Note which panels appear original, repaired, painted or replaced, but label uncertain identifications as uncertain. A logo, race stripe or factory-style color is not proof that a panel is original.
Gather receipts, earlier photographs and a list from the previous owner if available. Keep their statements as claims with dates, not as verified facts. Compare the bike against manufacturer brochures and model-specific service or parts information for the correct market. Do not use a nearby model year as a parts interchange chart. Yamaha's 2002 YZF-R1 release, for example, describes a new frame and fuel-injection system relative to earlier R1s. That establishes a meaningful generation change; it does not by itself prove which fairing panels or brackets interchange. Verify those separately.
If the machine has been crashed, the condition of steering, frame, subframe or mounting stays must be assessed by a qualified professional. A straight-looking painted panel is not a structural report. Keep cosmetic questions apart from roadworthiness and registration requirements.
Build an originality ledger, not a shopping cart
Make one row per part or assembly: upper cowl, left and right sides, lower, tail, tank cover if present, screen, lamps, mirrors, stays, rubber mounts, heat shields and relevant hardware. Add columns for current part, evidence of origin, condition, proposed disposition, missing mate, and source of any replacement. A small entry might read: “left side panel, manufacturer marking not yet checked, repaint visible, one repaired tab, retain for now, inspect inner face after safe removal.” That is far more useful than “old plastics bad.”
Use explicit disposition codes. Retain in service; repair assessment; preserve off-bike; replace with new aftermarket; seek used OEM; source correct original mounting part; and unknown. The codes keep the owner from selling or discarding an original panel before the project is understood. They also expose gaps: if the tail section is aftermarket but the stock rear light and bracket are missing, a “bolt-on return to stock” claim is premature.
Don't treat the ledger as a valuation certificate. It records evidence and decisions, not guaranteed resale premiums. Condition, provenance, local market and buyer goals vary, and none of those can be reduced to a universal return on a fairing purchase.
A starter ledger for one observed conflict:
| Area | Observed now | Evidence / uncertainty | Next decision |
|---|---|---|---|
| Left side panel | Repainted; one tab repaired | Inner markings not yet checked | Retain and document before ordering |
| Tail support | Aftermarket bracket visible | Original bracket location and condition unknown | Ask a qualified mechanic to assess |
| Headlight | Non-original unit fitted | Original lamp and harness status unknown | Verify exact model parts and wiring |
These entries are hypothetical examples, not findings from the cover motorcycle. Replace them with dated photographs and evidence from the actual bike.
Grade changes by reversibility
Grade A: exchangeable appearance. A documented aftermarket panel attaches to intact factory interfaces, and the original is retained and identified. It may be practical to swap appearances back later, subject to actual fitment and hardware condition.
Grade B: exchangeable with missing pieces. The factory interfaces appear intact, but original panels, grommets, stays or fasteners are missing. A return may be possible once the exact missing components are found and assessed. Do not promise the cost or availability before checking.
Grade C: modified interface. A bracket, lamp support, exhaust clearance area or harness route has been altered. A cosmetic replacement alone will not restore the earlier configuration. The proposed repair belongs in a separate technical work order, with the original specification and qualified installer identified.
Grade D: permanent or uncertain structural work. A cut or welded subframe, suspect frame tab, collision repair or unverified electrical splice cannot be called “100% reversible” from a photo. Stop the cosmetics-first plan until a competent professional evaluates the motorcycle and the applicable road-use requirements. These grades are planning labels, not an engineering certificate.
Trace the first fitment conflict
Remove and support bodywork according to the motorcycle's correct procedure; do not use a painted edge as a lever. Photograph fastener positions and bag hardware by location. With the existing panels relaxed, inspect the stays, grommets and adjoining parts. Does the panel naturally meet the tank and screen, or is a fastener pulling it into line? Is a cable trapped behind the nose? Has a custom exhaust changed lower-cowl clearance? Are there extra drilled holes from old crash protectors? Each finding belongs in the ledger before any replacement is ordered.
Our older Suzuki GSX-R restoration audit covers a broader bodywork and hardware inspection. This article adds a narrower question: which changes can be undone, with what evidence and by whom? It does not assume every old Suzuki, Honda or Yamaha needs the same panels or can use the same support hardware.
If you discover a modified mounting point, separate the remedy from the appearance decision. It may need a correct replacement bracket, a documented repair or a professional determination that the proposed project is inappropriate. Do not trim a new fairing to conceal the first conflict before its cause is understood. A smooth seam achieved by force is not proof of fitment.
Choose the bodywork path after the ledger
Retain and repair original panels. This may suit a rider who values surviving parts and has localized, assessable damage. Ask a capable repairer about the specific material, tab and finish. Do not assume every old panel is repairable or that a repair will be invisible.
Preserve originals and fit an alternate set. This can keep a documented original set off the bike while the rider enjoys a different look. It is only a reversible appearance choice if the motorcycle interfaces are appropriate and no permanent work is required. Follow our removed-fairing storage guide for labelling and support, and keep the original hardware and records with the parts.
Use newly finished replacement bodywork. Browse NiceFairings collections by the actual model and year and verify the exact product listing. A broad brand collection is not proof that a kit exists for a particular 1990s or 2000s variant. Ask what panels, finish and options are available; do not assume lights, stays, rubber parts, tank or all trim are included. If the old model is not listed, say so and ask us about availability rather than recommending a newer kit by resemblance.
Commission a personal interpretation. The custom-design page can start a color or graphic brief once the correct kit availability is confirmed. An era-inspired scheme should be described as an interpretation, not as a factory colorway or surviving original. Rights to sponsor marks and logos must be considered separately; a reference photo is not permission to reproduce every graphic.
Write a two-part work order
The first part is technical: confirm bike identity, inspect safety-critical areas, document mounting and electrical changes, list missing original components, and decide whether professional restoration is feasible. The second is cosmetic: select repair, retained-original or new-panel scope; define color and graphic intent; identify transferred trim and hardware; and plan a loose pre-fit before final assembly. Keep the two totals and schedules separate. A paint quote is not a mechanical restoration estimate.
Include a decision owner for each unknown. The mechanic answers questions about damaged supports and the correct assembly procedure. The fairing supplier answers what the selected product includes, the stated model-year application and what design can be confirmed. The owner decides whether originality, daily use or a personal visual direction is the goal. Where a part is missing or a claim is unsupported, no party should silently fill in the blank.
A useful acceptance record photographs the bike with panels loose-fitted, then documents final seams, light function, retained components and any unresolved limitation. Have qualified personnel complete the appropriate roadworthiness checks. Do not describe a bike as “back to factory” merely because its side profile resembles an old brochure.
The honest conclusion for a modified classic
Some projects can be visually refreshed while original parts are kept safe. Others need substantial technical restoration before a cosmetic decision makes sense. A few cannot honestly be sold as reversible at all, at least not on the evidence available. The right answer is not to give up on an older sportbike; it is to make the boundary visible.
Photograph the machine, grade each modification, preserve identifiable originals, verify the exact motorcycle and kit, and separate structural work from paint. That sequence protects the bike's history and gives NiceFairings a useful enquiry. It never promises a resale dividend, universal bolt-on fit or a frame that somehow becomes uncut when the new panels arrive.

.jpg)