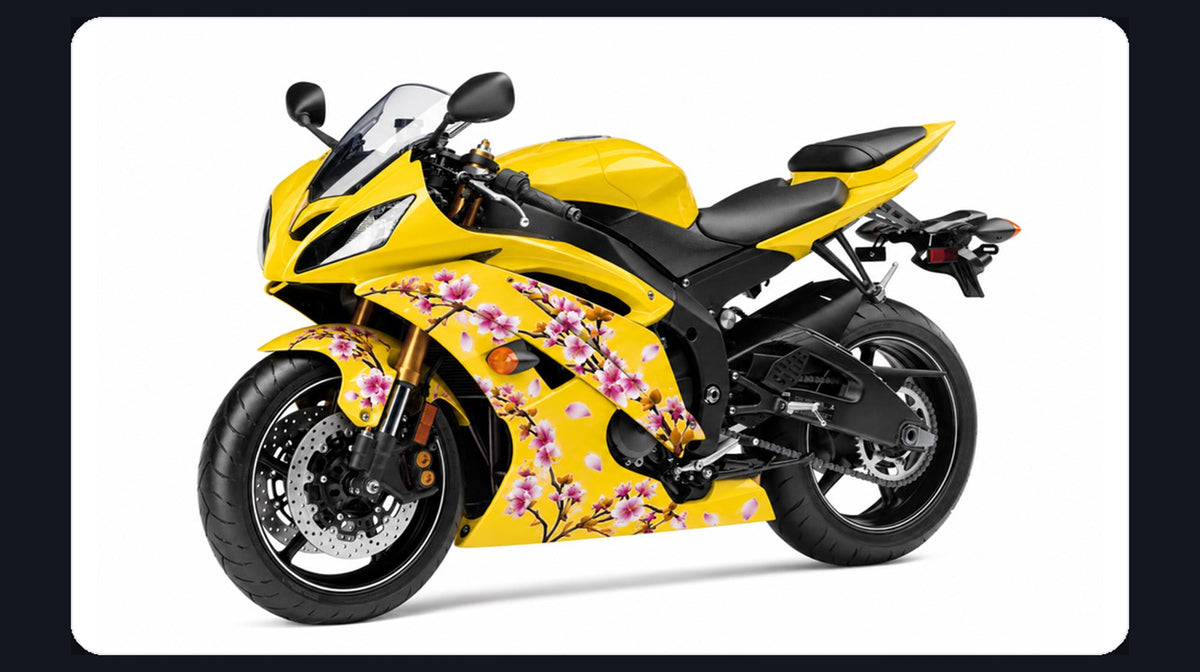
A yellow Yamaha R6 covered in pink blossoms is an easy image to remember. It is also an unusually demanding fairing brief. A race stripe can end at a panel edge and still look deliberate. A branch that ends there by accident looks broken. Our yellow cherry blossom R6 presentation shows both a complete-bike visualization and a laid-out kit. The two views are useful for different reasons: one shows the overall mood; the other exposes the panel boundaries that make or break the artwork. The bike view is a design visualization, not evidence that a particular kit has been installed on a customer's motorcycle.
This is a close reading of that one design, rather than a general color guide. If you are planning a graphic that crosses several pieces of bodywork, the principles apply whether your motif is floral, geometric or race-inspired.
The design has two scales
From across a parking lot, this R6 reads yellow first. The flowers are an accent concentrated around the lower side of the bike; they do not fill the tank, upper nose and tail equally. That restraint matters. If every painted surface carried the same density of petals, the fairing shape would become harder to read. The black seat, frame and wheel area also give the eye a pause between the bright surfaces.
At arm's length, the artwork becomes a set of branches, blossoms and loose petals. These small elements supply the character, but they are also the first things that can become awkward at a seam or mounting point. A good approval image therefore needs both a full-bike view and close views of the actual individual panels. A single glamorous side view cannot show where a graphic terminates underneath a neighboring piece.

NiceFairings design presentation. The complete bike is a visualization; the panel layout shows how the artwork is distributed, but neither view alone verifies fit or a finished customer installation.
Draw the branch on the motorcycle, then divide it into panels
The most visible branch runs across the side fairing and toward the lower cowl. That line should feel continuous when the bike is assembled, even though the paint is applied to separate pieces. Start with the assembled side silhouette and mark the branch's intended route. Then mark the precise edges of the upper side, lower side and any small infill pieces. The branch can cross a seam, but its entry and exit points must be planned as a pair.
There are two sensible ways to handle an unavoidable break. One is continuity: keep the branch's angle and thickness consistent on both sides of the gap. The other is an intentional stop: let the branch finish before the edge, leaving breathing room, and restart a related cluster elsewhere. The weak solution is accidental almost-continuity, where the branch misses its continuation by a few centimeters. It may look fine in a flat artwork file and wrong on the assembled bike.
Mounting holes, vents and turn-signal openings deserve the same attention. The focal blossom should not sit on a fastener or be cut in half by a vent. Put important flowers on broad, uninterrupted areas; use small petals where a panel must taper or disappear behind another part. The laid-out view helps identify these collision points before paint is approved.
Check the left and right sides separately
A rider sees one side in a photograph and assumes the other is mirrored. Fairing panels rarely give a perfect mirror canvas. Exhaust routing, vents, openings and the visible area around the engine differ. An exact mirror of the artwork may crowd one side while leaving a large empty patch on the other.
For this design, the goal should be a matched visual weight, not identical flower coordinates. Ask for left and right layouts with the motorcycle facing the same way in each view. Check where the main branch begins, where the densest blossom cluster falls and whether the lower cowl still reads as part of the same composition. Then ask for the nose and front fender separately: they are seen head-on and at three-quarter angles, not just in profile.
Keep the tank question explicit
In the presentation, the yellow tank area makes the design feel complete. A fairing kit listing, however, may show a tank cover, a painted tank photograph, or neither. Those are different things. The motorcycle's metal fuel tank is not automatically part of a plastic fairing kit. Before ordering, confirm the exact R6 2008–2016 collection listing and its itemized contents. If your existing tank is a different yellow, decide whether you want a close match, a deliberate contrast or a separate tank refinishing project. Do not infer the box contents from a whole-bike visualization.
The black mechanical center of the bike can help a colorful scheme feel grounded, but it also makes mismatched yellow more obvious across the upper fairing and tank. Daylight photographs are more useful for judging that relationship than a screen render alone. The same caution applies to pink: a bright magenta on a phone can print or paint closer to warm rose under different light. Approve a named reference and finished photographs when that distinction matters to you.
A practical approval sequence
If this floral treatment appeals to you, send NiceFairings' custom design team a concise brief: the exact R6 year, photographs of your current bike, the yellow and pink references you want, and a note about whether the tank will remain unchanged. Request an itemized panel list before treating any layout image as a complete-kit promise. Then review five views:
- The complete motorcycle from left and right.
- The front at a three-quarter angle.
- All painted pieces laid out, with the branch crossing points visible.
- Close views of vents, fastener zones and the front fender.
- Finished-paint photographs in even light before dispatch, if included in your order process.
This sequence is about approving the graphic and scope. It does not replace a physical fit check. When the kit arrives, inventory the pieces, transfer or confirm the required mounting hardware, and dry-fit major panels loosely before final tightening. Our pre-fit checklist covers that separate job.
The point of a floral R6 is not to make a sportbike look delicate. The contrast works because the underlying motorcycle remains sharp and mechanical while the art is allowed to be playful. To preserve that contrast in the finished build, give the artwork room to breathe and treat every panel seam as part of the design. Explore the R6 2008–2016 fairing collection, and use the full yellow cherry blossom presentation as a starting reference, not as a substitute for your own approval images.