The 2015 Yamaha YZF-R1 did something more interesting than borrow a racing color scheme. Yamaha changed the motorcycle's visual architecture: the air intake became the face, the street headlights moved down beside it, and horizontal body lines replaced some of the older sportbike's forward-diving gestures. A custom fairing can change color and graphic emphasis, but it cannot turn a different motorcycle into this one with paint alone.
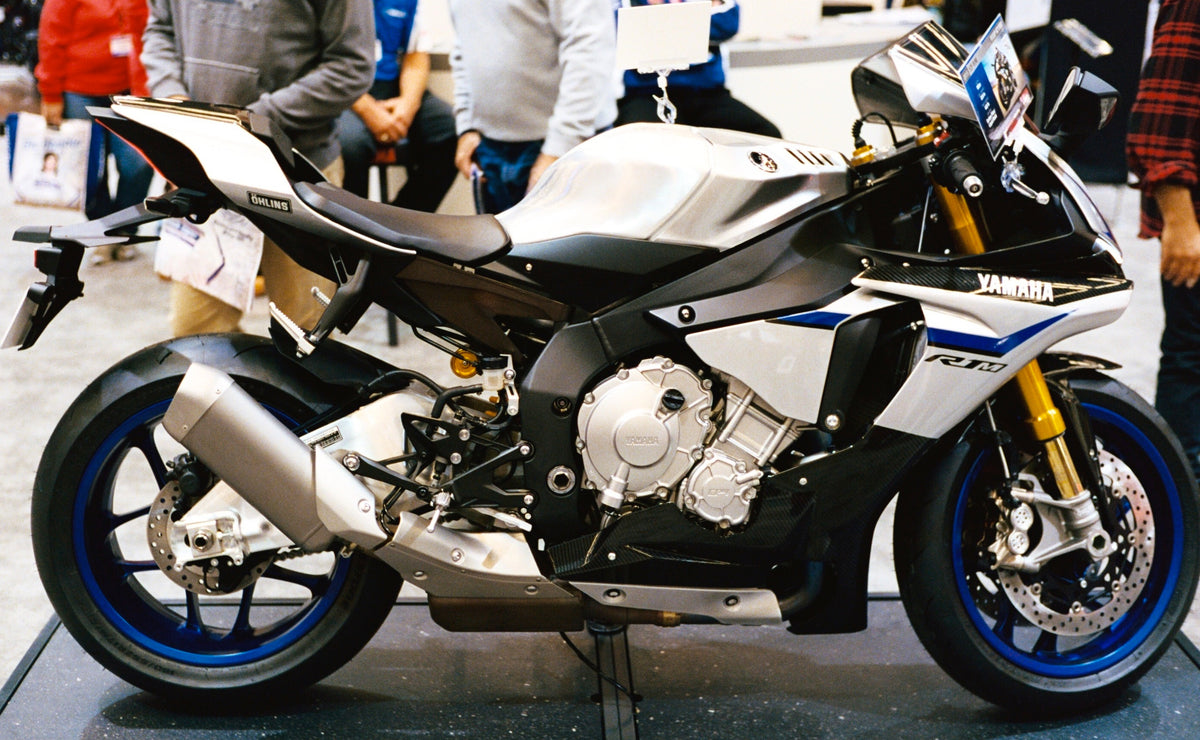
Cover: a real 2015 Yamaha YZF-R1M photographed by Dennis Bratland, CC BY-SA 4.0, unmodified. It is the R1M variant, not a NiceFairings kit or fitment reference.
That distinction is useful whether you own a 2015–2019 R1, admire an R1M, or are simply collecting references for a future build. The strongest brief begins by identifying what belongs to the motorcycle's shape, what belongs to its finish, and what belongs to a particular race livery. Confuse those layers and even a beautiful individual panel can look wrong when the bike is assembled.
The design decision was structural, not just decorative
Yamaha's own account of the R-Series describes the 2015 R1 as a sharp break from the previous version. Its designers took cues from the YZR-M1, placed a central intake at the front, relocated the projector headlights low and to either side, and emphasized more horizontal lines. The company also describes the fairing as having relatively little visual surface area. Those are Yamaha's design descriptions, not claims that replacement bodywork reproduces the factory aerodynamics or performance.
Look at a standard R1 from the front three-quarter angle. The upper nose is not a conventional face with two large headlamp “eyes.” Its dark center and slim upper surface lead your attention inward; the functional road lights sit lower. The result is a bike that can appear track-oriented even in a restrained color. A race number may strengthen that impression, but it did not create it.
For a custom-paint project, that means the first design question should not be “Which sponsor logos?” It should be “Which existing form do I want the eye to follow?” The answer might be the top edge of the side fairing, the dark negative space around the intake, or the line that carries from nose toward tank. A graphic can support one of those paths. Trying to support all of them at once often creates noise.

Separate the three visual layers
The first layer is body geometry: the nose, headlamp openings, side-panel relief, vents, tank shape and tail profile. Paint can reveal or quiet these features, but it does not move an intake or change a bracket. The second is surface treatment: the base color, sheen, stripe width, fade and the boundary between painted and retained parts. The third is identity: race numbers, names, logos and other references. This third layer is the easiest to copy and the easiest to overuse.
An R1 design brief is stronger when it works from the first layer outward. Mark the actual panels to be replaced and the components that will remain. If the tank stays its present color, it is part of the visual composition. If the owner wants a dark center around the nose, the brief needs to show exactly which panels and openings make up that center. “M-inspired” or “MotoGP-style” is not a placement instruction.
Consider two very different directions for the same 2015–2019 silhouette. A mostly dark build can use a quiet side field and one narrow accent to keep the central nose dominant. A high-contrast design can use the side panel as a broad color plane and let the dark intake remain a clear break. Neither direction is automatically better. The important thing is that the graphic has a reason to end or change where a real panel seam, vent or retained component interrupts it.
Why an R1M photo needs a careful caption
The R1M is useful as a design reference because it shows how a restrained palette can let the motorcycle's shape do the work. But it is not evidence that a standard R1 replacement kit includes R1M-specific parts or materials. Yamaha described the 2015 R1M as a higher-spec variant with carbon-fiber bodywork, among other differences. A painted ABS panel with a carbon-look graphic is not carbon-fiber construction. A photograph also cannot prove that an aftermarket R1 panel fits an R1M, or vice versa.
This is the larger editorial lesson: inspiration and specification are different. You can say, “I like the R1M's quiet metallic field and dark lower area.” You should not translate that into “make my kit R1M carbon” without specifying whether you mean color, graphic effect, material, or a particular physical part. If a listing or mockup is ambiguous, ask the seller to identify what is painted, what is a decal, what is a separate accessory and what is actually included.
Make the design work in four views
One glamorous quarter-angle image cannot approve an entire fairing. It hides the opposite side, compresses the nose, and may make a discontinuous stripe look continuous. For the 2015–2019 R1, review at least four views before a custom order is finalized:
- Front: Does the color treatment leave the central intake and the low road lamps visually legible? Are any proposed graphics near openings a design choice rather than an assumption about a physical cover?
- Left side: Does the main graphic follow the fairing's real surface and end intentionally at the tank, lower cowl and tail?
- Right side: Is the design intentionally mirrored, or does asymmetry have a reason? A left-side approval does not approve the right side.
- Complete panel layout: Which pieces are in the selected kit, and which visible parts will remain on the motorcycle? A styled illustration is not a packing list.
For a complicated stripe, add one more joined-panel view showing the seam it crosses. Do not demand that a flat floor layout look exactly like the installed motorcycle; the angles change. Use the flat view to review colors and scope, then use a bike view to review composition. The NiceFairings custom fairing page is a place to start a design conversation, not a substitute for a written, model-specific approval record.
The 2020 update is a useful boundary, not an invitation to convert by color
Yamaha revised the R1 again for 2020. Its 2019 launch release describes a newly designed fairing and compact LED dual headlights, while the company's longer R-Series history describes a more sculpted fairing surface than the 2015 design. That is why a screenshot of a later R1 should be labeled with its generation before it becomes a paint reference. The color combination may travel; the physical lines and openings do not necessarily travel with it.
This article is about design interpretation, not a compatibility chart. NiceFairings lists a 2015–2019 R1 bodywork example and a separate 2020–2025 example. Those live product pages demonstrate that the store organizes these as different applications; they do not establish that any individual part interchanges, that a particular accessory is included, or that a modified bike matches the listing. For the ordering question, use the dedicated R1 year-group fitment guide and confirm your actual bike with the seller.
A brief that a painter can answer
Here is the difference between a mood and an actionable request. “Make my R1 look like a factory race bike” gives the painter almost no boundaries. A useful message might instead say:
My motorcycle is a 2017 YZF-R1. I want a dark graphite field on the nose and side panels, one satin silver line that follows the upper side-cowl edge, and a small red accent that ends before the intake opening. The tank is staying black. Please show left, right, front and complete-kit views, identify which pieces are included, and tell me which parts of my reference photo cannot be carried onto this exact bodywork. Do not add a race-team logo or a performance claim.
That paragraph does not promise a result. It creates a reviewable conversation. The model and year still need verification; the seller still needs to check the chosen product; any existing aftermarket screen, mirrors, sliders or supports still need a separate fitment discussion. But the design can now be assessed by placement and scope instead of by vague adjectives.
If you are using a photograph of a real racing motorcycle, label it as inspiration and state which elements matter. Many race bikes have non-road bodywork, different lights, revised brackets and graphics tied to a particular season or team. A street kit should be evaluated for the street motorcycle you actually own. Likewise, a custom-painted shell should not be described as an aerodynamic upgrade merely because it echoes a racing silhouette.
The point of the exercise
The 2015 R1 shows why design is more than a paint file. Yamaha made the central intake, low lamps, horizontal lines and compact cowl part of the motorcycle's identity. The owner choosing replacement fairings can honor that character, deliberately contrast with it, or create a personal scheme. The honest path is to state which choice is being made, show it on the correct bodywork, and keep aesthetic inspiration separate from fitment and performance evidence.
To explore a design for your own bike, start with the NiceFairings catalog, then send the team your exact model year, clear photos of both sides and the front, a list of retained components, and a marked reference showing the color and graphic boundaries you want reviewed. Ask for a written response to anything the pictures cannot establish.
Sources and image notes
- Yamaha Motor's R-Series design history and 2015-on design notes describe the original design intent and headlamp/intake placement.
- Yamaha Motor's 2020 R1 announcement describes the later fairing and lighting update. These manufacturer sources concern Yamaha motorcycles, not NiceFairings replacement parts.
- Cover: a real 2015 YZF-R1M photographed by Dennis Bratland, CC BY-SA 4.0, used unmodified. It is the R1M variant, not the standard R1, and is not a NiceFairings product photograph. The inline standard-R1 photograph is separately credited above.