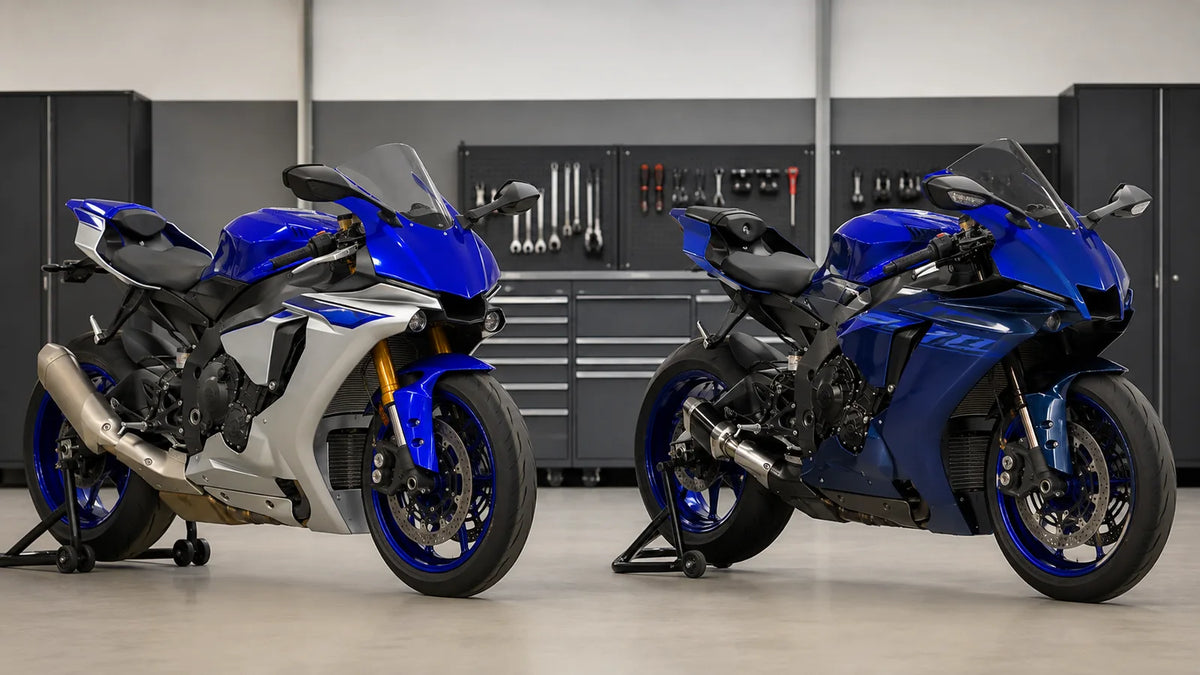
You cannot swap Yamaha R1 fairings between the 2015-2019 and 2020-2026 models without major changes. The two model groups have almost nothing the same. Yamaha fully redesigned the bodywork in 2020, changing mounting points, headlight shapes, and how air flows.
These differences are more important than you might think. Even panels that look similar at first glance should not be assumed to fit correctly. You will get gaps, rubbing, and broken tabs if you force the fit.
Before ordering any bodywork, check your exact model year. Look at your VIN or use official Yamaha documents. This one step stops costly mistakes. For riders looking for replacements or upgrades, NiceFairings offers special kits for each model, so you get the correct panels for your bike.
Key Takeaways
Yamaha R1 fairings from 2015-2019 won't fit 2020-2026 models.
The two generations have different mounting points and body shapes.
Look at the 10th letter or number in your VIN to find out your bike's exact year.
Things you can see, like winglets and nose width, help tell which generation it is.
Order fairings that are made for your bike's exact generation and sub-model.
Try a dry fit first, then tighten all bolts to prevent gaps and damage.
Use the correct tools and avoid tightening too much to protect your new fairings.
Check your model year two times before you order. This helps you avoid expensive errors.

Yamaha R1 Fairings: Generation Differences Explained
The 2015-2019 vs 2020-2026 Breakpoint
Design Philosophy Shift
Yamaha split the R1's design history into two clear eras. The 2015-2019 generation took style cues from the YZR-M1 MotoGP bike. It had a sharp, small nose cone with a center intake. The lines were neat and focused. The aim was to cut drag and look fierce.
The 2020 update changed everything. Yamaha turned its focus to aerodynamics and downforce. The new bodywork became wider, more shaped, and more useful. The design adds built-in winglets and air paths. These parts change how air moves over the bike. They also changed every mounting point.
Yamaha shared this big shift on July 13, 2019. That date marks the clear split between the two generations.
July 13, 2019 - Yamaha Motor Corporation, USA, today announced the new 2020 YZF-R1M and YZF-R1 Supersport motorcycles, featuring ... advanced bodywork with outstanding aerodynamic performance, and next-generation R-Series design.
This news confirms that the two generations are not swappable. The body panels for the 2015-2019 bike should not be assumed to fit the 2020-2026 model. You cannot swap them without cutting, drilling, and making new brackets. The headlight unit, side panels, and tail all use different attachment points.
Body Panel Architecture Changes
The fairing structure changed completely. The 2015-2019 R1 uses a simpler mounting setup. The panels attach with direct screw points. The 2020-2026 R1 uses a more complex system with hidden fasteners and locking tabs. These differences mean you cannot mix parts.
Here is a comparison of the key structural differences:
Feature |
2015-2019 R1 |
2020-2026 R1 |
|---|---|---|
Design philosophy |
MotoGP replica styling |
Aerodynamic performance |
Nose shape |
Sharp, narrow, central intake |
Wider, winglet-integrated |
Side panel profile |
Angular, compact |
Sculpted, air-channel design |
Tail section |
Pointed, narrower |
Wider, more rounded |
Mounting system |
Direct screw points |
Hidden fasteners, interlocking tabs |
The table shows the main differences. The 2020-2026 bike is wider overall. The side panels have visible air channels that guide airflow around the rider. The tail is wider to fit new electronics. These changes required a full redesign of the inner brackets.
If you need replacement bodywork, you must buy the right set for your specific generation. NiceFairings offers dedicated kits for each model. You can browse the 2015-2019 Yamaha R1 fairings collection for the older style. The 2020-2026 Yamaha R1 fairings collection has the updated aerodynamic design. Each kit is molded specifically for that generation.
How to Verify Your R1's Model Year
Before you order any parts, you must confirm your bike's exact year. This step prevents costly mistakes. Many riders think their bike is one year when it is actually another. Used bikes often have mixed parts or wrong registration.
VIN and Title Checks
The VIN (Vehicle Identification Number) is the most reliable source. Look at the 10th character. This digit shows the model year. For example, the letter "G" means 2016. The letter "L" means 2020. The letter "N" means 2022. You can check your title or registration papers too. These documents list the model year clearly.
You can also use the official Yamaha website or the NHTSA VIN decoder. These tools give a full breakdown of your bike. Never guess the year based on looks alone. Some owners modify their bikes with aftermarket parts that change the look. A 2018 bike with 2020 replica fairings will still have 2018 mounting points.
Visual Identification Cues
If you cannot access the VIN, you can use visual cues. The 2015-2019 R1 has a narrower nose with a center air intake slot. The headlights sit lower on the fairing. The side panels have a simpler, more angular shape. The tail rises to a sharper point.
The 2020-2026 R1 has a wider front end. The air intakes are bigger and more obvious. The headlights sit higher and have a sharper angle. The side panels include visible aerodynamic channels. The tail looks bulkier from the rear. The overall shape is more aggressive and modern.
These visual cues help you spot the generation quickly. But always verify with the VIN before ordering parts. For custom paint or graphics, visit the NiceFairings custom fairings page to create a unique look for your specific model. Accurate identification ensures you get panels that fit correctly.
Front Fairing and Headlight Assembly
The front fairing shows the biggest visual change between the two R1 generations. If you park a 2018 model next to a 2022 model, the noses look like they come from different bikes. These changes go beyond looks. The headlight shape, air intake position, and mounting brackets all moved to new spots.
The 2015-2019 "M1" Inspired Nose
Yamaha built the 2015-2019 front end to mirror their YZR-M1 MotoGP bike. The nose has a sharp, pointed shape that gets narrower toward the front wheel. A single central air intake sits between the twin LED headlights. This intake sends air straight into the ram air system. The headlights sit fairly low inside the fairing nose. Their angled shape points inward toward the center.
The overall look is compact and aggressive. Small winglets appeared on some models, but they stayed subtle. The front fender uses simple mounting points. The inner fairing panels have basic screw spots that line up with the frame spars. You can take off the whole nose section with standard hex tools. The design focuses on simplicity and less weight.
The 2020-2026 "Aero" Redesign
The 2020 update brought a totally different approach. Yamaha focused on aerodynamic downforce and airflow control. The new nose looks wider and more shaped. Large carbon fiber winglets stick out from the sides of the fairing. These winglets create real downforce at speed. The central air intake got bigger and more noticeable. Its shape now guides air more effectively toward the airbox.
The headlights moved higher in the fairing. Their shape became sharper and more angled. The LED projectors now sit in separate housings with clear bezels. The whole front profile looks heavier but more purposeful. The design matches Yamaha's current MotoGP style. Every surface has a job for managing airflow.
Mounting Points and Bracket Differences
The mounting systems share almost nothing between generations. The 2015-2019 nose attaches with visible screw points. You can reach these fasteners from the outside. The 2020-2026 fairing uses hidden fasteners and locking tabs. This system means you must remove inner panels first. The process takes longer but gives a cleaner outside look.
The headlight mounting brackets differ completely. A 2015-2019 headlight assembly will not bolt into a 2020-2026 fairing. The mounting ears, electrical connectors, and alignment tabs all changed. The rubber air ducts that link the nose intake to the airbox also have different shapes. These ducts route differently through the frame.
Some riders want to give their 2015-2019 bike the 2020 look. Conversion kits exist for this job. But these kits need more than just new fairings. You need the full headlight assembly, new rubber air ducts, updated wiring harness adapters, and modified mounting brackets. The cost adds up fast. The process also needs cutting or drilling on some mounting points.
For a simpler fix, you can look at custom options. The NiceFairings custom fairings page offers made-to-order solutions. You can ask for changes that add newer styling parts to your current bike. This way avoids the hassle of a full conversion.
Before ordering any front fairing, check your exact model year. The Yamaha R1 fairings collection at NiceFairings sorts kits by generation. The 2015-2019 collection fits the M1-inspired nose. The 2020-2026 collection matches the aerodynamic redesign. Each kit comes with the right mounting hardware for that specific generation.

Side Panels, Belly Pan, and Tail Section
Moving past the nose, you face more fitment challenges. The side panels, belly pan, and tail section look similar between generations at a quick glance. Do not let that fool you. Every mounting point and internal bracket changed for 2020. You cannot swap these parts between the 2015-2019 and 2020-2026 bikes without serious modification work.
Side Panel Contours and Air Vents
The side panels on the 2015-2019 R1 have a sharp, angular profile. They hug the frame tightly and use visible screw points for attachment. You can remove them with basic tools in minutes. The air vents sit low near the radiator and direct hot air away from your legs.
The 2020-2026 side panels take a different approach. Yamaha sculpted deep channels into the surface. These channels guide air around the bike and reduce drag at speed. The panels also extend further outward. This wider stance changes how the panels attach to the fuel tank and subframe. Hidden fasteners and interlocking tabs replace the simple screws of the older model.
Even the inner panels differ. The 2020+ bikes route wiring differently through the side area. The brackets that hold the panels to the frame spars have new shapes. If you try to mount a 2018 panel on a 2022 bike, the edges will not line up. You will see gaps at the tank junction and rubbing against the radiator shrouds.
Belly Pan Shape and Exhaust Clearance
The belly pan shows another clear difference. The 2015-2019 design sits closer to the engine. It has a simpler shape with fewer aerodynamic features. The exhaust collector and catalytic converter have generous clearance underneath.
The 2020-2026 belly pan extends lower and wider. Yamaha added aerodynamic elements that improve downforce. The shape now wraps around the exhaust more tightly. This tighter fit means the belly pan from one generation will not clear the exhaust of the other. A 2019 belly pan on a 2021 bike will hit the catalytic converter. A 2021 belly pan on a 2018 bike will leave a large gap underneath.
The mounting tabs also moved. The 2020+ belly pan attaches to the frame at different points. It uses additional brackets near the oil pan. These brackets do not exist on the older frame. You cannot bolt the newer belly pan to the older bike without fabricating new mounts.
Tail Section and Subframe Mounting
The tail section presents the trickiest fitment problem. At a glance, the 2015-2019 and 2020-2026 tails look similar. Both have the sharp, raised design that screams sportbike. The mounting systems share nothing.
The 2020+ tail is slightly wider than the older version. Yamaha needed extra space for new electronics. The updated bike has a more complex ABS module and rider aid sensors. These components sit under the seat. The wider tail accommodates them. This extra width changes where the tail attaches to the subframe.
The subframe itself changed for 2020. The mounting holes moved by small amounts. The brackets that hold the tail section have different angles. Even the rear fender and license plate holder use new attachment points. You cannot transfer a 2018 tail onto a 2022 subframe without drilling new holes.
Even if a panel appears to bolt on, it may rub against other components. The clearance tolerances are tight. A panel that sits too close to the exhaust or wiring can cause damage over time. You might also see unsightly gaps that ruin the bike's appearance.
For replacement bodywork, you need generation-specific parts. The Yamaha R1 fairings collection at NiceFairings separates kits by model years. Each set comes molded for the correct mounting points. You avoid the guesswork and get panels that fit your bike properly.
Aftermarket Yamaha R1 Fairings: Options and Choices
Aftermarket Yamaha R1 fairings let you refresh your bike's look or get it ready for track days. The key is picking a kit made for your exact generation. NiceFairings offers dedicated sets for both the 2015-2019 and 2020-2026 models. You can browse the full Yamaha R1 fairings collection to see what fits your bike. Each kit comes molded for the correct mounting points, so you skip the guesswork of mixing parts.
Street vs. Race-Ready Kits
Street kits focus on durability and easy installation. They use thicker plastic that resists cracking from road debris. The panels include all the mounting holes you need. They also come with the right hardware for a clean install. These kits handle daily riding, weather, and small drops without failing.
Race-ready kits focus on weight reduction and aerodynamics. They use lighter materials and thinner profiles. The panels fit tighter to the bike for better airflow. Many race kits leave out street parts like mirror mounts or license plate brackets. You would need to add those parts yourself if you ride on public roads. Race kits also assume you have aftermarket exhaust systems that change the belly pan clearance.
Material Choices: ABS, Fiberglass, and More
The material you choose affects weight, cost, and durability. Each option has trade-offs you should know before ordering.
Material |
Key Advantages |
Key Drawbacks |
|---|---|---|
ABS Plastic |
Affordable, lightweight, impact-resistant, easy to mold, weather-resistant |
Less stiff than alternatives; can crack under extreme impacts |
Fiberglass |
Higher strength and rigidity than ABS; durable and impact-resistant |
Heavier than ABS and carbon fiber; repairs are more intensive |
Carbon Fiber |
Lightest and strongest; superior performance and aesthetic appeal |
Very high cost; difficult to repair; brittle under some impacts |
ABS plastic suits most street riders. It bends slightly under impact instead of shattering. This flexibility protects the panels during minor tip-overs. Fiberglass offers more rigidity for track use. It holds its shape better at high speeds. Carbon fiber sits at the top for weight savings and looks. Turn1 confirms their carbon fiber parts use 100% authentic material. These parts reduce weight compared to stock and improve aerodynamics.
Durability ratings vary by material quality. Standard ABS earns a high rating. Premium ABS reaches very high durability. Race-grade fiberglass rates only moderate because it cracks more easily under stress. For street use, ABS performs excellently. Fiberglass works best when you accept its rigidity limits.
Color and Graphic Customization
Your fairing kit arrives unpainted or pre-painted depending on your choice. Customization lets you match factory colors or create something unique.
Factory Replica Schemes
Factory replica schemes copy the official Yamaha racing liveries. You can choose the classic Monster Energy Yamaha look or the newer Yamaha Factory Racing design. These graphics use precise color matching and placement. They make your bike look like the machines ridden by factory racers. Replica kits include all the decals, stripes, and number boards you see on the professional bikes.
Unique Custom Designs
Custom designs break away from factory looks. You pick the colors, graphics, and finishes. The NiceFairings custom fairings page lets you build a one-of-a-kind appearance. You can request matte finishes, metallic flakes, or airbrush artwork. The team works with you to finalize the design before production. This route gives you full control over your bike's identity.
Whichever option you select, confirm your model year first. The 2015-2019 collection and the 2020-2026 collection keep the generations separate. Ordering the correct kit saves you time and money.

Pre-Order Fitment Checklist
You have reached the point where you know what you want. Before you click that order button, slow down. A few minutes of verification now saves you weeks of frustration later. This checklist walks you through every step. Follow it in order. Do not skip ahead.
Confirm Your Bike's Generation
Your first task is simple but critical. You must know which generation you own. The 2015-2019 models and the 2020-2026 models share almost no bodywork. Mixing them creates gaps, broken tabs, and wasted money.
Start with the VIN. Look at the tenth character. That letter or number tells you the model year. A "G" means 2016. An "L" means 2020. An "N" means 2022. Write this down. Keep it visible while you shop.
Next, check your title and registration papers. These documents list the model year clearly. Compare them with the VIN. Sometimes paperwork contains errors. If the two disagree, trust the VIN. It never lies about the year.
Finally, look at your bike's visual cues. The 2015-2019 R1 has a narrower nose with a central intake slot. The 2020-2026 model has a wider front with visible winglets. The tail section on the newer bike looks bulkier from behind. These cues confirm what the VIN tells you.
Select the Correct Kit for Your Model
Once you know your generation, you need the right kit. The Yamaha R1 fairings collection at NiceFairings separates everything by model years. You will find the 2015-2019 collection for the M1-inspired design. The 2020-2026 collection covers the aerodynamic redesign.
Now check your sub-model. The standard R1 and the R1M use different materials. This difference affects your purchase.
Sub-model |
Fairing Material |
Additional Details |
|---|---|---|
Standard R1 |
Painted plastic (Team Yamaha Blue, Performance Black) |
Standard bodywork with factory color schemes |
R1M |
Full carbon fiber |
Carbon windscreen fairing, side fairings, front fender, tail section; polished aluminum swingarm; serial-numbered badge |
The R1M uses carbon fiber throughout. The standard R1 uses painted plastic. If you own an R1M, you need carbon fiber replacement panels. If you own a standard R1, painted plastic works fine. Ordering the wrong material type creates fitment problems. The mounting points differ slightly between the two sub-models.
Check for Additional Required Parts
Your fairing kit does not include everything. You may need extra parts to complete the installation. Plan for these before you order.
Hardware and Fasteners
Most aftermarket kits include basic mounting hardware. You still need to check what comes in the box. Some kits ship without screws, clips, or rubber grommets. The original hardware from your stock fairings may work. But you might have lost pieces during removal.
Inspect your existing fasteners. Look for stripped threads, bent brackets, or missing clips. Replace anything damaged. Using worn hardware on new fairings causes rattles and loose panels. You also need the correct tools. Hex keys, socket wrenches, and plastic trim removal tools cover most jobs.
Windshields and Accessories
Your new fairing kit may not include a windshield. The stock windshield from your old fairings might fit. But check the mounting hole spacing. Aftermarket kits sometimes use different hole positions than stock. If the holes do not line up, you need a new windshield.
Other accessories to consider include mirror mounts, license plate brackets, and inner panels. Race-style kits often omit these street parts. You must transfer them from your stock bodywork or buy new ones. Confirm what your kit includes before ordering.
Before you paint or mount anything, review the NiceFairings installation pre-fit guide. This detailed checklist walks you through every step. It covers dry fitting, alignment checks, and common mistakes. Following this guide prevents costly errors.
For custom paint or graphics, visit the NiceFairings custom fairings page. You can request unique designs that match your vision. The team works with you to finalize the look before production begins.
Double-check your model year one more time. Confirm the sub-model. Verify the kit includes everything you need. This final review takes five minutes. It saves you from returning wrong parts and waiting weeks for replacements. Order with confidence when you know your bike matches the kit.
Installation Preparation and Pre-Fit Tips
You have your new fairing kit in hand. The boxes sit on your workbench. Before you start working, take time to prepare. A little planning now stops cracked plastic and broken tabs later. The installation process rewards patience. It punishes people who rush.
Essential Tools for the Job
Get your tools ready before you touch any panel. You do not want to stop mid-job to find a missing socket. A full toolkit makes the work smoother. It also keeps your new bodywork safe.
Start with a good socket set. You will need both metric and standard sizes. The R1 uses metric bolts. But aftermarket kits sometimes use standard heads. Having both sets covers every case. Add a set of screwdrivers. You need both Phillips and flathead. Many inner panels use screws, not bolts. A torque wrench also belongs in your kit. Over-tightening cracks plastic and strips threads. The torque wrench helps you apply the right force each time.
You also need plastic trim removal tools. These cheap tools pop off clips without scratching your paint. A flathead screwdriver works in a pinch, but it leaves marks. Spend a few dollars on proper trim tools. Your fairings will thank you. Keep a soft cloth nearby to protect surfaces. Lay it over the tank and frame to stop scratches.
The Importance of a Dry Fit
A dry fit means trying every panel without tightening all the bolts. This step catches problems before you finish. Skipping it leads to frustration and damage.
Start by mounting the biggest panels first. The front fairing, side panels, and tail section each need a trial run. Put each panel in place. Insert a few screws loosely. Do not tighten anything fully. Check the gaps between panels. Look for uneven spacing or edges that do not line up. Move each panel gently to see if it shifts or binds against other parts.
Pay special attention to where panels meet. The area between the side panel and fuel tank often shows fitment issues. The belly pan-to-exhaust clearance also needs checking. If a panel rubs against metal or wiring, you need to adjust it. A dry fit lets you make these changes while everything is still loose.
Leave the panels in place for several minutes. Walk around the bike and look at every angle. Sit on the bike and check your leg position against the side panels. This full review shows problems you might miss from one angle. Once you confirm everything lines up, tighten the bolts in a logical order. Work from the center outward. This method pulls panels into place without creating stress points.
Common Pitfalls to Avoid
Several mistakes ruin fairing installations. Knowing them helps you stay clear. The most common error is forcing panels into place. If a panel does not fit easily, something is wrong. Stop and check. Forcing a panel cracks the plastic or snaps mounting tabs. These repairs cost more than the original job.
Another pitfall is over-tightening bolts. Yamaha R1 fairings use small screws and clips. These parts strip easily when you tighten too much. Tighten each bolt until it feels snug, then stop. The torque wrench helps here. Set it to the maker's recommended value and trust the tool.
Rushing the installation creates problems too. You might skip the dry fit or ignore a small gap. That gap gets worse over time. Vibration from the engine makes it bigger. Loose panels rattle and wear against each other. Take your time and do the job right the first time.
Finally, do not mix hardware from different kits. Aftermarket fairings sometimes use slightly different bolt lengths. Using the wrong screw can poke a hole in a panel or fail to hold the bracket. Keep your hardware organized. Match each screw to its correct spot.
For a full walkthrough of the pre-fit process, see the NiceFairings installation pre-fit checklist. This guide covers every step in detail. You can also check the Yamaha R1 fairings collection to make sure you have the right kit for your model year before you start.
Yamaha R1 fairings from the 2015-2019 generation should not be assumed to fit 2020-2026 models. The headlights, mounting points, and body contours differ completely. You cannot swap these parts without extensive modification. Use the pre-order checklist in this guide before buying any kit. Confirm your model year twice. Check the VIN. Verify the sub-model. These steps prevent costly mistakes and ensure a smooth upgrade.
NiceFairings offers dedicated kits for each generation of the R1. Browse the Yamaha R1 fairings collection to find the correct set. Each kit matches the mounting points of your specific model year. Visit the custom fairings page for unique paint options. Take your time. Verify the year twice. Order once.

FAQ
How do I know if my R1 is a 2015-2019 or 2020-2026 model?
Look at the tenth character in your VIN. That letter or number tells you the model year. You can also check visual clues. The 2020+ bike has winglets and a wider nose. The older model has a sharper, narrower front end. Always verify before you order any fairings.
Will R1M fairings fit a standard R1?
No. The R1M uses carbon fiber bodywork with different mounting points. The standard R1 uses painted plastic panels. Each sub-model has its own attachment spots. You must order fairings made for your exact sub-model. The Yamaha R1 fairings collection sorts kits by both generation and sub-model.
Can I convert my 2018 R1 to the 2020 body style?
Yes, but the job needs more than new fairings. You need the updated headlight assembly, different rubber air ducts, and modified brackets. The wiring harness also needs adapters. This conversion costs much more than a standard fairing replacement. Think about custom options instead for an easier route.
What material should I choose for street riding?
ABS plastic works best for most street riders. It bends slightly under impact instead of shattering. This flexibility protects panels during minor drops. Fiberglass offers more rigidity but cracks more easily. Carbon fiber gives the lightest option but costs the most. Your riding style decides the right choice.
Do aftermarket fairings include all mounting hardware?
Most kits come with basic hardware, but not always everything. Check the product description before ordering. Some kits ship without certain clips or rubber grommets. You may need to reuse hardware from your stock fairings. Check your existing fasteners for damage before you start the installation.
How long does a typical fairing installation take?
A careful first-time installation takes four to six hours. You need time for a proper dry fit and adjustments. Rushing leads to cracked panels and misaligned gaps. Plan for a full afternoon without interruptions. Review the NiceFairings installation pre-fit checklist before you begin.
Can I order custom graphics on my fairing kit?
Yes. The NiceFairings custom fairings page lets you design a unique look. You pick colors, graphics, and finishes. The team finalizes the design with you before production starts. This option works for both the 2015-2019 collection and the 2020-2026 collection.
What happens if I order the wrong generation fairings?
The panels will not line up with your mounting points. You will see gaps, rubbing, and broken tabs if you force the fit. Returning the kit costs time and shipping fees. Double-check your VIN and sub-model before ordering. This verification stops costly mistakes and delays.
See Also
Top Yamaha R6 Fairing Kits For Performance And Aesthetics
Essential Reasons To Equip Yamaha R6 Fairings
Advantages And Disadvantages Of Custom Panigale V4 Fairings In 2025
Five Leading Motorcycle Fairing Brands To Consider In 2025
Best Replacement ZX6R Fairings Evaluated For Riders
Related Fitment and Buying Resources
- Explore the related NiceFairings collection
- Explore the related NiceFairings collection
- Explore the related NiceFairings collection
- Plan a custom-painted fairing kit