
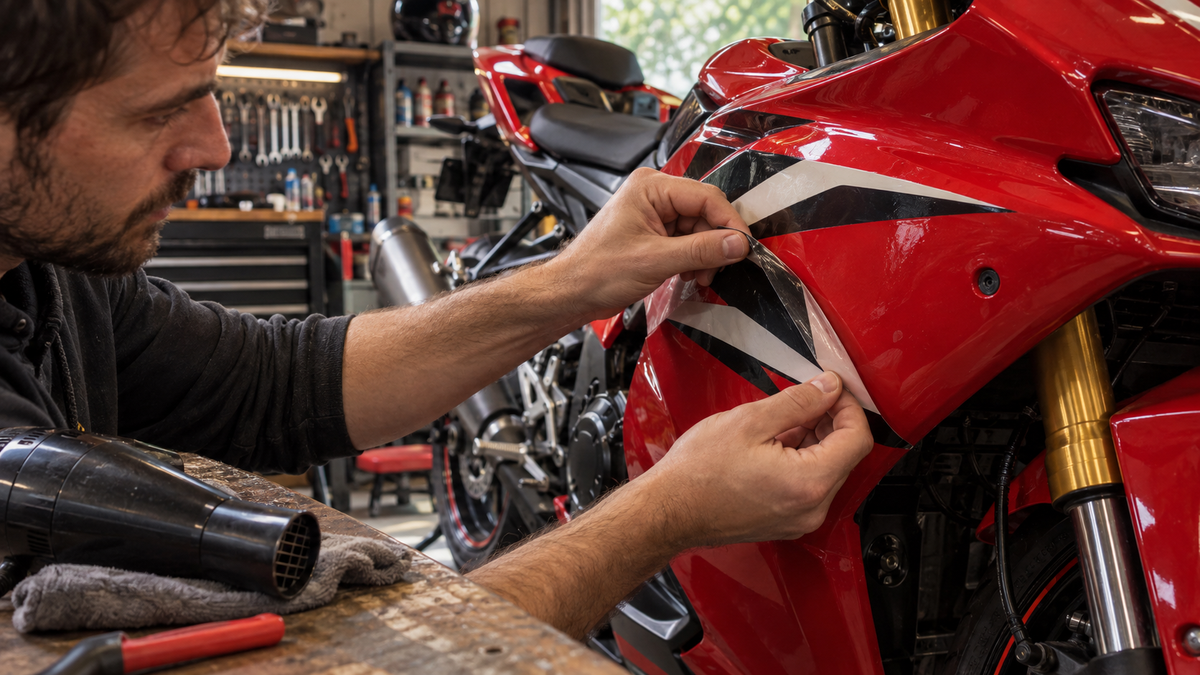
Cover visual: controlled low-angle removal of a surface-applied vinyl graphic from a painted sportbike fairing. The action shown directly matches the method explained in this guide.
Removing a sticker from motorcycle bodywork is easy only when the film, adhesive and paint are all healthy. An aged graphic can become brittle; an old repair can release with the adhesive; a fresh refinish may not be fully cured. The safest plan is to identify the graphic, inspect the substrate and run a small test before warming or pulling anything.
This guide covers removable surface-applied vinyl on painted fairings. It does not apply to graphics sealed beneath clear coat. If you cannot feel an edge and the design appears buried under the topcoat, stop: that graphic is part of the paint system and cannot be peeled away as a separate sticker.
Identify the Graphic Before You Touch It
Wash the area gently, dry it and inspect the edge under good light. A surface decal normally has a detectable edge or a slight height change. An under-clear graphic feels continuous with the surrounding finish. A painted stripe may have a masked edge but no film to lift.
| What you find | Likely construction | Next step |
|---|---|---|
| A distinct flexible edge | Surface-applied vinyl or sticker | Assess paint condition and test removal in a small area. |
| No edge; continuous clear coat | Under-clear graphic | Discuss refinishing with a painter; do not try to peel it. |
| Hard color boundary with no film | Painted stripe or graphic | Treat it as part of the coating system. |
| Cracked, chalky film with lifted corners | Aged surface graphic | Expect slower removal and more residue; test carefully. |
If you are unsure, compare the construction with our surface decal and under-clear graphic guide. The correct identification prevents the most expensive mistake: trying to lift a design that is sealed into the finish.
Check Whether the Paint Is a Safe Substrate
Look for chips, cracks, bubbling, oxidation, previous repair edges and areas where the clear coat is already lifting. Ask when the panel was painted. Fresh paint needs the full cure period specified by its manufacturer before film is applied or removed.
3M’s current graphic removal bulletin specifically warns that aged, repaired, damaged, unstable or insufficiently cured painted surfaces may be damaged during removal. It also explains that heat, ultraviolet exposure and humidity can make old film more brittle or increase adhesion. That is why a technique that worked on one original panel may fail on a refinished panel beside it.
Take clear “before” photos. Include the whole panel, the decal edge and every existing chip or repair. Photographs help you distinguish pre-existing damage from changes during the job and make a professional assessment easier if the test fails.
Tools for a Controlled Removal
- Clean microfiber towels
- A plastic film-lifting tool or a clean fingernail
- A controllable source of mild warmth, used conservatively
- A surface-compatible adhesive remover with current instructions
- Nitrile gloves and the protective equipment stated on the cleaner label
- Mild wash solution approved for the finish
Do not begin with a metal razor, screwdriver or knife on painted ABS. A sharp tool can cut through clear coat and into the plastic in one movement. Do not use a heat gun at an uncontrolled temperature. Thin plastic and repaired areas can distort before the front surface feels dangerously hot.

Step-by-Step: Remove a Surface Decal Without Forcing It
1. Clean and Stabilize the Panel
Work indoors or in shade with the panel at a moderate, stable temperature. Remove loose grit with a gentle wash and dry the area. Support a removed panel so it keeps its natural curve. Do not press a curved fairing flat against a bench.
2. Start with a Small Test Area
Choose an inconspicuous corner. Lift only enough film to see how the paint responds. If color, clear coat or repair material rises with the adhesive, lay the film back down without pressing it hard and stop. A bodywork professional should assess the substrate before you continue.
3. Warm a Small Zone Evenly
Mild warmth can make some films more flexible, but the useful temperature depends on the film and substrate. Keep the heat source moving, work in a small area and avoid concentrated heat near thin edges, tabs or repaired plastic. The panel should never become too hot to handle comfortably. When product instructions specify a range, follow that range rather than guessing.
4. Pull Low and Slowly
Grip the lifted film and pull it back at a low angle, close to the surface. Work steadily across the warmed zone rather than pulling upward in one hard motion. 3M notes that removal speed and angle affect residue. If the film stretches cleanly, continue in small sections. If it snaps into chips, re-evaluate the temperature and film condition instead of scraping aggressively.
5. Stop at Seams and Fragile Areas
Reduce force where the graphic crosses a panel edge, repair, sharp body line or existing chip. Do not use the decal as a lever against a thin tab. If a graphic continues beneath another panel, remove the neighboring part only by the correct service procedure; never tear the film at a hidden mounting point.
Adhesive Residue: Use the Product Instructions
Residue does not mean the job failed. Old film may leave adhesive even when the paint remains intact. Use a cleaner whose manufacturer states that it is suitable for painted surfaces and follow its label, dwell time, ventilation and protective-equipment requirements. For example, 3M General Purpose Adhesive Cleaner is described for adhesive residue on painted surfaces when used as directed; it is an industrial/occupational product, so availability and handling requirements matter.

- Apply the minimum amount to a clean cloth or as the product directs, rather than flooding panel seams.
- Test a hidden area and watch for color transfer, softening or gloss change.
- Work on a small residue patch with light pressure.
- Change towels as adhesive transfers; a dirty towel can smear residue across the panel.
- Remove all cleaner as directed, then wash and dry the area.
Do not combine adhesive remover with brake cleaner, acetone, gasoline or paint thinner. Do not leave a solvent-soaked cloth resting on the panel. Even a product intended for automotive use can damage an unknown or poorly cured refinish if its instructions are ignored.
Special Cases That Deserve a Stop
Fresh Refinish
Confirm the paint manufacturer’s cure schedule and the painter’s advice. “Dry to touch” does not necessarily mean ready for adhesive removal or reapplication.
Matte or Satin Finish
Do not polish adhesive haze away. Abrasion can make a permanent shiny patch. Use only products approved for the finish and stop if sheen changes.
Cracked or Repaired Panel
A repaired substrate may have several coating layers and a vulnerable transition. If film crosses the repair, professional removal may cost less than repainting a lifted area.
Brittle, Sun-Baked Vinyl
Film that breaks into flakes requires patience. Divide the work into small areas. Aggressive scraping saves minutes and can create hours of paint correction.
Lettering You Want to Replace in the Same Position
Before removal, take straight-on measurements from fixed panel edges and make a paper reference. Do not rely on photographs taken at an angle. If a replacement design crosses seams, review our guide to graphics across fairing seams and viewing angles.
Inspect Before Applying a New Graphic
After washing, allow the surface to dry fully. View it under diffuse light and from a shallow angle. Check for lifted clear coat, adhesive islands, scratches, gloss differences and contamination trapped along edges. A new decal will not hide an unstable surface; it may make the next removal harder.
If the panel needs paint correction or refinishing, complete that work and observe the full cure time before installing new film. When the design is being approved remotely, use the lighting and angle checks in our finished-fairing photo checklist.
Post-Removal Checklist
- No paint, clear coat or repair material lifted during the test or full removal.
- No adhesive remains at panel edges, holes or seams.
- The cleaner has been removed according to its instructions.
- Gloss or matte sheen is consistent across the worked area.
- Existing chips and repairs have been rechecked against the before photos.
- The surface is fully dry before a replacement graphic is positioned.
- Fasteners and panels removed for access are reinstalled in the correct order and checked before riding.
A good decal-removal job is deliberately uneventful. Identify the construction, test the weakest-looking area, use controlled warmth and a low pull angle, and let the paint condition decide how far you proceed.
FAQ
Can I remove a decal that is under clear coat?
Not as a separate sticker. The graphic is part of the coating system, so removal normally requires refinishing work.
Is a hair dryer always safe on an ABS fairing?
No. Heat output, distance, panel thickness and previous repairs vary. Use only mild, controlled warmth and stop if the panel or finish changes.
Can I use a metal razor on painted bodywork?
Avoid it. A metal edge can cut the clear coat or plastic. Use a paint-safe plastic lifting tool and the film maker’s removal method.
Why did the film come off but leave glue?
Age, heat, UV exposure, film type and removal angle all influence residue. Use a compatible adhesive remover as directed rather than increasing scraping force.


