You feel that sting when you see your S1000RR on its side after a low-side. The damage is frustrating. Now you face a key choice: buy a full fairing kit or replace only the broken panels. Your decision comes down to three things-total cost, how hard it is to match paint, and the work needed to install. Here is a quick answer. For most riders with moderate damage, a full kit is the more practical and cheaper option. Individual panels work best for very small, isolated scrapes. Finding the right BMW S1000RR replacement fairings starts with knowing this trade-off.
Key Takeaways
Check the damage before you order parts. Look for cracks, broken mounts, and bent brackets.
Check your S1000RR generation and model year. This makes sure the fairings fit right.
A full fairing kit keeps the color the same across all parts. It costs less when you need to replace several panels.
Individual panels work for minor damage. They risk paint mismatch from fading.
OEM panels are designed to follow the original model-specific mounting layout. They cost more than aftermarket parts.
Aftermarket kits are a good deal. But you need to research their quality and how well they fit.
Dry-fit panels before final assembly. This catches alignment and hardware issues.

Assessing the Damage After a Low-Side
Before you shop for BMW S1000RR replacement fairings, stop. Look at the bike first. A thorough inspection saves you from ordering the wrong parts. It also keeps you safe. Scratches hide deeper problems. Cracks hide worse ones. Take your time here. Your wallet and your safety depend on this step.
Safety First: What to Inspect Before Ordering Parts
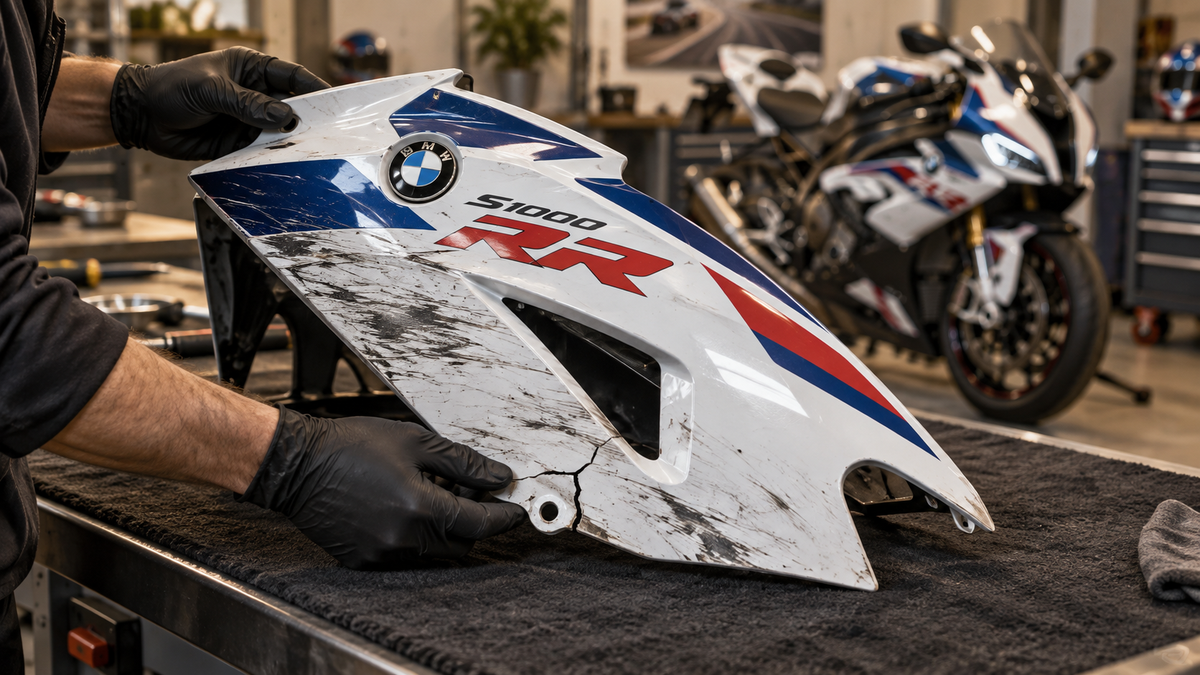
Your first job is not cosmetic. It is structural. Walk around the bike. Look at every panel with fresh eyes. Touch the plastic. Press gently on cracked areas. A hairline crack today becomes a shattered panel tomorrow. Check the mounting tabs on each piece. These small plastic hooks break easily in a low-side. A broken tab means the panel will not seat correctly. It will rattle. It may even catch wind at speed.
Checking for Structural Cracks and Broken Mounts
Start with the obvious damage. Look for cracks that run through the paint. These often extend further than you think. Run your finger along the crack. Feel for rough edges. That roughness tells you the crack goes through the material. Next, check every mounting point. Flip the damaged panel over if you can. Look at the back side. Many cracks start there. They hide behind the painted surface. A panel with a broken mount needs replacement. Whether a broken mount can be repaired depends on its location, material and load; ask a qualified repairer to assess it before reuse.
Identifying Damage to Inner Fairing Stays and Brackets
Now look deeper. The inner fairing stays hold your bodywork to the frame. These metal or plastic brackets absorb impact energy. A low-side often bends them. Remove the damaged outer panels carefully. Inspect the stays underneath. Look for bent metal. Check for stress marks near bolt holes. Compare the left side to the right side. If one side sits differently, you have bracket damage. Order new stays before you order new plastic. Otherwise, you will mount fresh panels onto bent frames. They will never align properly.
Confirming Your S1000RR's Generation and Model Year
BMW changed the S1000RR fairings between generations. The 2010-2014 bikes look different from the 2015-2018 models. The 2019-present generation has its own shape. Each generation uses different mounting points. Ordering the wrong generation's panels wastes your money. You cannot return painted parts easily.
Check your owner's manual first. Find the model year printed there. Then verify with the VIN. The tenth character of your VIN indicates the model year. Write this number down. Keep it with you when you browse parts. Every listing should ask for this information. If a seller does not confirm your generation, move on.
Create a detailed list of every damaged panel. Include the front nose fairing. Note the side panels. List the belly pan. Do not forget small vents and trim pieces. These small parts often get overlooked. They also cost more than you expect. This list becomes your shopping guide. It tells you exactly what you need. It prevents impulse purchases. It also helps you compare full kits against individual panels with real numbers.
BMW S1000RR Replacement Fairings: Full Kit vs. Individual Panels
Your damage list is right in front of you. Now comes the big choice. Should you buy single panels or go with a full set? Each option has its own perks. What you pick depends on how much damage there is, what you can spend, and how flawless you want the bike to look.
The Case for Buying Individual Panels
Individual panels work well when the damage is limited. Maybe one side panel is scratched. Perhaps the front fender has scuffs. Or a belly pan section is cracked. In these cases, you only replace what is broken. You pay for just those parts. You do not waste money on panels that are still fine on your bike.
The Benefit of Lower Initial Cost for Minor Damage
The math is simple. One broken panel costs less than a whole kit. You save cash for other things like upgrades or track fees. This plan works best when your check shows damage on only one or two pieces. You looked at the inner brackets. You checked the mounting points. You know the rest of the bodywork is solid. Order that single piece. Put it on. Get back to riding.
The Challenge of Matching Factory Paint
Here is the hidden problem. BMW puts several paint layers on at the factory. The base color, the metallic bits, and the clear coat all work as one. Your bike has aged over time. Sunlight has faded the original paint. Even bikes kept in garages show slight color changes over the years. A brand-new factory panel will not perfectly match your current bodywork. The difference might be small. You might only see it in certain light. But you will see it.
Aftermarket single panels face the same issue. The painter tries to copy your bike's current color. They cannot allow for every tiny shade change. Your bike's paint has its own story. A true match needs a skilled painter with a special tool called a color spectrometer. That service costs more. Your "cheaper" single panel now has extra hidden costs.
The Case for a Complete Fairing Kit
A full kit can reduce color-matching differences because the panels are finished together. Panels finished in the same paint batch are generally more visually consistent with one another. Your bike looks put together. It looks brand new. This evenness matters more than most riders think.
Color Consistency Across a Complete Kit
When you buy a full set of BMW S1000RR replacement fairings, you reduce color-matching uncertainty. The maker sprays all panels at once. They dry together. They ship together. You install them together. The result is intended to look more consistent across the bodywork. Your bike looks like it just left the showroom. This level of consistency can be harder to achieve with single panels bought at different times.
The Convenience of a Single Order with All Necessary Parts
One order. One shipment. One box with everything you need. You do not search for parts that are no longer made. You do not wait weeks for a side panel that is on backorder. You get the full set and start working. This ease saves you time and stress. It also stops the common error of forgetting a small trim piece. You have all parts in hand before you begin.
The Cost-Effectiveness of a Bundle for Multiple Damages
Look at your damage list again. If three or more panels need replacing, buying them one by one adds up fast. Each panel has its own shipping fee. Each order needs its own paint matching step. A full kit combines these costs into one price. You often pay less for the whole set than for three separate OEM panels. This deal makes full kits a smart pick for medium to heavy damage.
Track riders often choose full kits for another reason. They want tough, replaceable bodywork. They know crashes happen. A full kit gives them a steady base. They can swap broken parts without stressing about paint match. Street riders who want a perfect factory look might pick OEM single panels. They accept the higher price for a sure fit and finish.
Your choice comes down to these factors. Count your broken panels. Think about how much color difference you can handle. Compare total prices. The right answer depends on your own situation.

OEM vs. Aftermarket Fairing Options
Once you pick between a full kit and single panels, the next question comes up. Should you buy genuine BMW parts or look at aftermarket choices? This choice affects your budget, your time, and your final look. Knowing the pros and cons helps you spend money the right way.
The Pros and Cons of Genuine BMW Panels
Genuine BMW panels come straight from the factory. They have the same quality as the bodywork that left the showroom. The mounting geometry follows the original design, giving installers the closest reference fit when the underlying brackets and hardware are undamaged. The finish follows BMW's original specification, though age and fading can still affect a visual match. Your bike looks factory-new because it wears factory parts.
Factory Reference Fit and Finish
OEM panels are designed for the original mounting layout, but damaged stays, transferred hardware and previous repairs can still affect installation. You do not drill extra holes. You do not fight with misaligned brackets. The hardware moves directly from your old panels. This certainty saves you hours of frustration. The paint also carries BMW's original color code. You know the finish will look right because BMW made it.
The High Cost of OEM Parts
That certainty comes with a high price. OEM panels cost more per piece than aftermarket options. You pay extra for stickers, hardware, and paint. These add-ons raise your total quickly. When you need several panels, the cost grows fast. Many riders find OEM pricing hard to accept for a bike they plan to track or ride daily.
Exploring Aftermarket Kits and Panels
Aftermarket fairings offer a different route. They cost less upfront. They often group multiple panels into one kit. This setup makes them appealing when you face moderate damage. The downside? You must research brands carefully. Quality varies a lot across manufacturers.
Understanding the Range in Quality and Price
Aftermarket options cover a wide range. Some brands make thin plastic that cracks easily. Others deliver strong bodywork that rivals factory quality. Price often signals quality, but not always. You might find a complete kit for several hundred dollars. Compare the complete delivered package, included trim, and current listing details rather than relying on a price quoted by another seller. Compare that to buying three or four OEM panels one by one. The savings become clear. But you must check what the kit includes. Some bundles include vents, trim, and hardware. Others leave you searching for small parts.
The Importance of Researching Brands for Fitment
Fitment separates good aftermarket brands from bad ones. A panel that does not align right ruins your bike's look. It also creates wind noise at speed. Read reviews from other S1000RR owners. Look for photos of installed kits. Check forums for complaints about specific brands. This research takes time but prevents costly mistakes. A trusted seller stands behind their products with clear policies.
A Reliable Source for Aftermarket Fairings
One aftermarket source worth your attention is NiceFairings. They focus on sportbike bodywork, including a dedicated BMW S1000RR collection. You can browse their available kits and single panels at their BMW S1000RR fairings page. Their catalog covers multiple generations, so you can find the right fit for your model year.
Before ordering, visit their customization page to learn about your paint options. You can often choose colors and finishes that match your vision. Then check their production and shipping page for lead times. Aftermarket parts take time to make. Knowing this timeline helps you plan your rebuild. Finally, review their FAQ page for answers about fitment, installation, and returns. These resources set clear expectations about what you receive.
When you compare OEM and aftermarket, think about your goals. Do you want a perfect factory finish for a show bike? OEM gives you that certainty. Do you want affordable BMW S1000RR replacement fairings that get you back on the road? Aftermarket kits offer that value. Neither choice is wrong. The right one depends on your budget and your standards.
Making the Final Choice: Budget, Skill, and Outcome
Now you have all the facts. You know your damage. You understand your options. The final decision rests on three pillars: your budget, your skill level, and the outcome you want.
Evaluating Your Budget and Desired Result
Money drives most decisions. But your goal matters just as much. Ask yourself one question first. What do you want from this repair? Do you need a bike that looks perfect in the garage? Or do you need a machine that performs well at the track? Your answer changes everything.
The Track Bike vs. Showroom-Quality Street Bike Dilemma
Track riders face different pressures than street riders. You might scrape plastic every season. You accept that risk. Your bike wears its scars like badges. For you, a full aftermarket kit makes sense. You get durable bodywork at a fair price. You do not stress about tiny color shifts. You care about function, not perfection.
Street riders feel the opposite pull. You park your S1000RR at coffee shops. You show it to friends. You want that factory shine. OEM panels provide the closest factory reference, typically at a higher cost; actual color matching and resale effects still depend on condition and documentation. The choice becomes a trade-off between your wallet and your pride.
Resale value adds another layer to this puzzle. Consider what happens when you sell your bike someday. The condition of your fairings affects the final price. Here is what you should know:
A clean, well-fitted and consistently finished set of panels may support buyer confidence at resale.
OEM fairings are noted to retain resale value.
Keep invoices and clear fitment records so a future buyer can understand what was replaced.
Buyers notice quality. They also notice mismatched paint. A uniform set of panels signals care. That signal translates into dollars when you negotiate.
Factoring in Your Own Mechanical Skill
Your hands matter as much as your budget. Some riders swap fairings in an afternoon. Others struggle with basic tools. Be honest with yourself about your abilities. This honesty saves you frustration later.
The Complexity of Drilling, Fitting, and Aligning New Panels
Aftermarket fit can vary by supplier and model year. Dry-fit every panel, verify the mounting points against the motorcycle, and contact the seller or a professional before drilling, trimming, or permanently altering a painted panel.
OEM panels fit without modification. Every hole lines up. Every tab seats correctly. You transfer hardware and tighten bolts. The job takes hours, not days. If you lack experience, this simplicity matters. A professional installation costs extra. Factor that fee into your total budget.
A Simple Decision Matrix for Your Damage
Use this table to guide your choice. Match your situation to the right recommendation.
Decision Criterion |
Recommendation / Implication |
|---|---|
Replacement scope |
Determine if only a single panel (e.g., left lower) is damaged or if a full kit is needed. Partial sets save money but require matching existing paint codes. |
Cost & repair strategy |
Segmented (modular) panels allow individual replacement after an incident, reducing long-term repair costs. |
Aesthetic & performance trade-off |
Modular panels have visible seams and may slightly alter aerodynamics compared to one-piece OEM units. |
Now apply this framework to your specific damage.
Scenario One: Minor Scratches on One or Two Panels
You see light scuffs on the left side panel. Maybe the front fender shows wear. The rest of the bike looks clean. Individual panels make sense here. You save money. You keep your undamaged factory bodywork. The catch? Paint matching. If your bike has aged, a new panel may not blend perfectly. Compare the cost of two OEM panels against a full aftermarket kit. Sometimes the kit costs nearly the same. When that happens, the full kit gives you better value and a uniform finish.
Scenario Two: Significant Damage to Multiple Panels
Three or more panels need replacement. Cracks run through the plastic. Mounting tabs are broken. Your paint match risk grows with each panel. A full kit becomes the smart choice. You get consistent color across every piece. You avoid the headache of coordinating multiple orders. Aftermarket kits shine in this scenario. They bundle everything you need at a price that beats piecemeal OEM purchases.
Scenario Three: Damage to All Panels on One Side
A hard low-side often grinds down every panel on one side. The nose fairing, side panel, belly pan, and tail section all show damage. This situation demands a full kit. No question about it. The cost of replacing four or five OEM panels individually would exceed a quality aftermarket kit. You also eliminate paint matching problems entirely. Every panel comes from the same batch. Your bike looks cohesive again.
When you shop for BMW S1000RR replacement fairings, keep this matrix in mind. Match your damage level to the right solution. Your budget stays intact. Your bike looks great. Your stress stays low.

Installation Planning and Professional Help
Your new fairings have arrived. Before you start installing, plan your workflow. A dry-fit reveals problems before they become permanent. This step matters most for aftermarket bodywork. Factory parts fit without guesswork. Aftermarket panels need your careful attention.
Set up a clean workspace. Gather your tools. You need a socket set, Allen keys, a torque wrench, and plastic trim tools. These plastic tools protect your new paint from scratches.
The Importance of a Pre-Fit Workflow
Test every panel before final assembly. A pre-fit catches alignment issues early. It highlights missing hardware too. This takes an afternoon and saves you days of rework.
Dry-Fitting Panels Before Final Assembly
Start by reviewing the NiceFairings pre-fit guide for your kit. It explains the correct mounting order. Begin with the front cowl. Add the side panels next. Finish with the tail section. This sequence ensures proper overlap between pieces.
Work on a clean, padded surface. Test each panel without tightening bolts. Just set them in place. Check that every hole and tab lines up. Look for gaps or uneven overlaps. A small gap becomes wind noise at speed. If alignment is off, stop and verify the model-year fitment, brackets and hardware. Contact the seller or a professional before drilling, sanding or trimming painted panels.
Checking Alignment and Hardware Transfer
Most riders forget to transfer hardware. Old fairings hold rubber grommets, plastic clips, and metal fasteners. These parts must move to your new panels. Remove every clip from the damaged bodywork. Inspect each piece for wear. Replace broken fasteners. Dry rubber cracks during installation. New grommets prevent loose panels later.
Test the fit again after transferring hardware. Tighten bolts finger-tight. Step back and look from three angles. Stand in front. Walk to the side. Crouch low to check the belly pan. Every gap should look even. Every edge should flow into the next panel.
Recognizing When to Call a Professional
Sometimes you hit a wall. The panels do not line up. Do not force the fit. Forcing cracks the plastic. Know your limits. A professional fixes what you cannot.
Identifying Complex Fitment Issues
Look for these signs. A panel that pushes against another piece. A gap that will not close. Bolt holes that do not align after drilling. These point to bent fairing stays or a misaligned subframe. A professional shop has tools to measure and correct these problems. They have experience with your S1000RR too.
The Value of a Professional Painter for Color Matching
Install the panels yourself to save labor cost. Let a pro handle the paint if color matching matters. A shop uses color spectrometers. They measure your existing paint exactly. They blend new paint to match. They apply clear coat evenly. The result looks factory-fresh. Without this step, you risk visible differences between panels. A professional painter removes that risk.
Your decision comes down to three factors: damage extent, budget, and desired finish. No single answer works for everyone.
For moderate to severe damage across multiple panels, a full kit delivers uniform color and better value. Individual panels only make sense for tiny, isolated scrapes where paint matching poses minimal risk.
Start with a thorough inspection. Document every cracked panel and broken mount. Then research your options, including aftermarket sources like NiceFairings. Compare total costs honestly.
Choose the path that gets you back on the road with the least hassle. Your S1000RR deserves a clean recovery.

FAQ
How do I know if my S1000RR needs new fairings or just repairs?
Check for cracks that go all the way through the plastic, not just scratches on the surface. Press gently on damaged spots. Look for broken mounting tabs on the back of the panel. If you see structural damage, it's better to replace than repair. Whether plastic repair is appropriate depends on the crack location, material and remaining mounting strength; consult a qualified repairer for structural damage.
Will aftermarket fairings match my bike's factory paint?
Aftermarket kits finished together are generally more consistent across the included panels. Your old undamaged panels might show slight color differences from age and sunlight. To get a uniform look, replace all panels at once with a complete kit.
What tools do I need to install new fairings?
You need a socket set, Allen keys, a torque wrench, and plastic trim tools. The trim tools protect your new paint from scratches. Most riders already have these basics. Set aside an afternoon for the job. A dry-fit before final assembly prevents costly mistakes.
How long does shipping take for aftermarket fairings?
Aftermarket fairings need production time before they ship. Check the NiceFairings production and shipping page for current lead times. Plan your rebuild around this schedule. Rushing leads to mistakes. Order early so you have parts ready when you start.
Can I install fairings myself or should I hire a professional?
You can handle installation if you have basic mechanical skills. Aftermarket panels may need minor hole drilling or edge trimming. If panels do not align after dry-fitting, stop and call a professional. Forcing the fit cracks the plastic and wastes your money.
What should I do with hardware from my old fairings?
Transfer every rubber grommet, plastic clip, and metal fastener from your old panels. Inspect each piece for wear before reinstalling. Replace cracked or brittle fasteners. New grommets prevent loose panels and rattles later. This step takes time but prevents frustration during final assembly.
How do I choose between a full kit and individual panels?
First count your damaged panels. One or two minor scrapes might justify individual panels. Three or more damaged pieces make a full kit more economical. Compare total costs honestly. A full aftermarket kit often costs less than several OEM panels bought separately.
What if my fairing stays or brackets are bent?
Replace bent brackets before mounting new plastic. Fresh panels on bent frames will never line up right. Compare both sides of the bike to spot differences. If you see damage here, order new stays with your fairings. This prevents fitment headaches during installation.
Do you have more questions about fitment or ordering?
Visit the NiceFairings FAQ page for detailed answers about fitment, installation, and returns. You will also find information about customization options and what to expect for paint and finish. Review these resources before placing your order.