
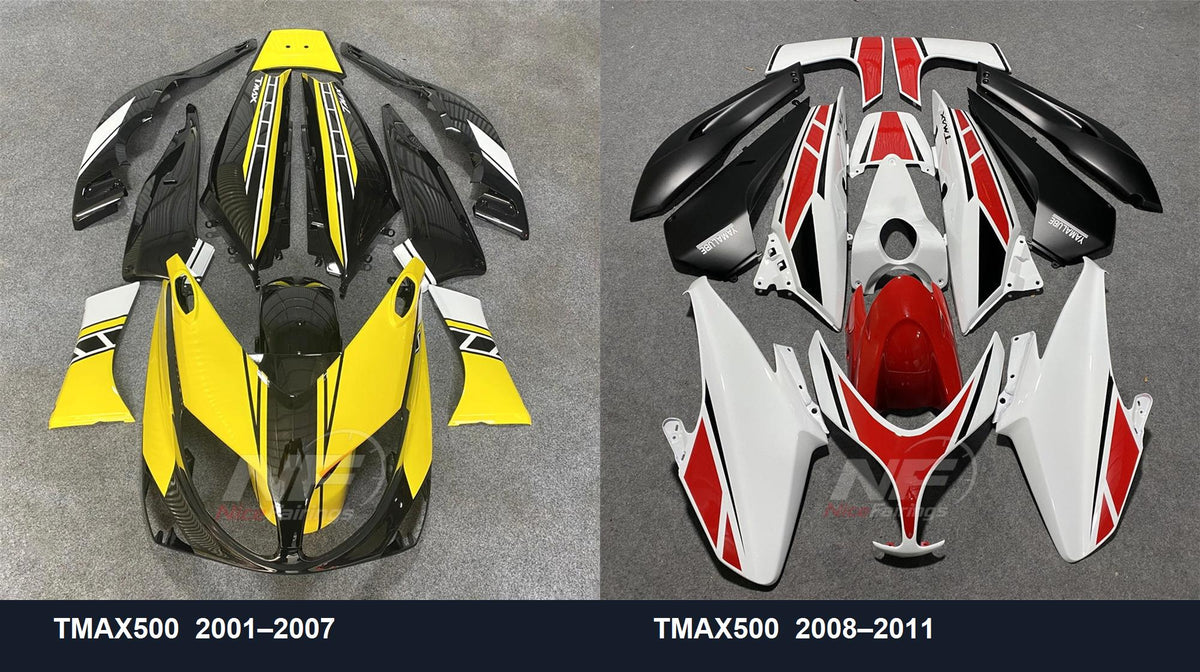
A seller calls it a “2008 TMAX,” but the scooter in your garage might have been registered in 2008, manufactured earlier, or repaired with panels from another bike. If you shop for a painted fairing kit using the registration year alone, the mistake may not reveal itself until every panel is on the floor. The sensible first step is to identify the bodywork generation on the actual scooter.
This matters particularly at the 2007/2008 boundary. Yamaha described its 2008 European TMAX as a model change with a newly designed aluminum frame and new exterior design. Its announcement also calls out a new front and rear appearance, a two-piece front screen and a revised meter panel. Those are meaningful clues, but a photograph or a registration date on its own is not a parts catalog. Read Yamaha’s original 2008 model announcement.
First, separate the model year from the paperwork year
“2008” can mean several things in a used-bike listing: model year, date of first registration, or simply the year the seller remembers buying it. Those labels are not interchangeable. If your scooter sits near the generation break, record the VIN or frame number and ask a Yamaha dealer or a reliable OEM parts catalog to confirm the specific model designation for your market. Do not publish the complete VIN in a public comment or photo.
Then compare the bike you own with the candidate kit. A bike may have had a front-end repair, a changed screen, or replacement trim. A VIN-based model identification is the foundation; visible bodywork details tell you what is currently fitted. If those two disagree, pause the order and resolve the discrepancy with the seller before choosing a painted set.
Which number should you send?
For a private fitment conversation, send the model designation and the relevant VIN-derived model information requested by the seller. You can also provide a clear photo of the manufacturer label if it is legible and you are comfortable sharing it privately. Avoid assuming that an online VIN decoder for another market interprets your scooter correctly. Registration databases, dealer catalogs and model codes can use different conventions. When there is doubt, ask a Yamaha parts counter to identify the model from the frame number, then bring that result to the fairing seller.
For example, a scooter first registered in early 2008 is not automatically the redesigned 2008 model. Yamaha announced the European 2008 model in September 2007 and said releases would begin from October 2007, depending on distributor. That timing illustrates why the paperwork date is an imperfect shortcut. The reverse can also happen: a later registration can belong to earlier inventory. The specific machine settles the question.
What changed at the 2008 break?
Yamaha’s primary-source description is unusually helpful here. The company says the 2008 model received a new exterior design, revised front and rear views, a two-piece front screen and a new symmetrical meter layout with a central keyhole. It also describes a new aluminum frame. We use those statements to establish that the 2008 model is a real generation change, not a cosmetic color update. We do not take them as proof that every individual fastener or panel is incompatible across years; that would require part-by-part OEM number checks.
For a fairing order, inspect the whole assembly rather than judging by paint color. Compare the outline around the headlamps, screen base, nose and front fender; follow the seams between the inner front panels and outer side panels; and compare the rear side trim and tail. A color scheme can be copied onto a different generation. The shape of the openings, tabs and adjoining pieces is much more useful.

A five-photo check before you order
You do not need to strip the scooter to begin. Take five clear photographs in daylight:
- Front three-quarter view. Include both headlamps, the screen base, front fender and the leading edges of both side panels.
- Full left side. Show every seam from nose to tail and the footboard/step-through area.
- Full right side. This catches asymmetrical openings and any prior repair that is invisible on the other side.
- Rear three-quarter view. Include the taillight surround and the ends of the rear side panels.
- Close-up of the damaged or missing area. Show its neighboring tabs, brackets and fasteners, with a second view from farther back so its location is obvious.
Keep the photos straight and well lit. A wide-angle shot taken inches from the nose can distort the shape you are trying to compare. If the scooter is already disassembled, photograph the back of an intact OEM panel and any molded part number as well. Part numbers can be stronger evidence than a color or an online listing title.
Read a photo as a map of connections
Do not just ask whether two scooters “look alike.” Trace where each painted panel ends and the next piece starts. On the front, follow the seam from the screen base down around the lamp assembly, then outward toward the side panel. At the middle, note the position and shape of access doors, vents and footboard edges. At the rear, compare where painted side trim meets the lamp, seat and lower black plastic. A mismatch at one junction can explain why a seemingly similar full kit cannot simply be persuaded into place.
One missing photograph often causes an avoidable delay: the underside of the existing panel at the exact damaged area. If you can remove a loose or broken piece safely, photograph its molded tabs, screw bosses and any transferred grommets before discarding it. Put a ruler or familiar object in frame only when it helps show scale; never use a measurement from a perspective-distorted photo as the sole fitment proof. If a broken tab remains on the scooter, photograph the receiving bracket too.
How to read a fairing product page
NiceFairings has separate live collections for TMAX500 2001–2007 and TMAX500 2008–2011. Start in the collection that corresponds to the confirmed model, then inspect the individual product page. Check the exact year range in its title and description, the photographed pieces, and the design you expect to receive. A collection range is a shopping filter; final fitment should still be confirmed against your exact scooter.
Ask three specific questions before purchase. First: does the seller need the VIN-derived model code or a front/side photo to confirm fitment? Second: which parts are included in this particular kit, and which stock clips, screws, rubber pieces, windscreen or inner panels must be reused? Third: if the bike has a nonstock screen, lamp, bracket or other front-end modification, which parts of the proposed kit could be affected? The answers may differ by kit and by bike, so avoid assuming that a photographed layout is a universal packing list.
Confirm the order in writing
Once a design catches your eye, save the exact product URL and send your photos with a short note: “My confirmed model is [designation], my registration year is [year], and these photos show the current panels. Please confirm whether this exact kit is intended for my scooter and identify any original parts I must reuse.” Ask the seller to repeat the confirmed generation and paint design in the order conversation. This is especially useful for custom-painted bodywork, where the parts may be prepared after your order rather than taken from a shelf.
If you are changing color, decide whether you want the entire visible body to read as one design. A kit photo can show major painted pieces but may not include every small inner trim, grab-rail surround or nonpainted cover on your scooter. Compare what is pictured with what is currently visible on the bike, and ask which pieces are part of the quoted set. A clear inclusion list prevents a perfectly fitting kit from feeling incomplete after installation.

When the year is right but the panels still do not line up
A correct generation is necessary, but it does not eliminate every installation issue. A bent front stay, broken mounting tab, substituted inner panel or missing rubber mount can change where an outer panel sits. On a used scooter, inspect the structural and mounting pieces before treating visible gaps as a painted-kit defect. If an old panel has already been removed, keep it until the replacement is fully installed: it is the best reference for hidden tabs and transferred hardware.
Dry-fit before tightening. Put the major pieces in position with screws only finger-tight, compare the seams, and check that moving parts and the screen have clearance. Do not force a tab into a hole just because the paint matches. If the mounting points do not correspond, stop and verify the model and any repaired brackets. Drilling or trimming a newly painted panel to solve an unidentified generation mismatch can turn a reversible buying question into permanent damage.
What to check on delivery day
Photograph the unopened carton and the contents as you unpack, then lay the panels on a clean, soft surface. Compare the physical pieces with the agreed product layout and any seller-provided packing list. Look at both sides of each panel for transit damage, paint defects or broken tabs before removing protective wrap. This is the right moment to report a discrepancy, before the parts have been mounted or modified.
Group original fasteners by location as you remove them. Transfer rubber supports or clips only where the kit instructions and the corresponding original piece call for them. A screw that feels unusually resistant may be cross-threaded, entering the wrong boss or trying to pull a misaligned panel into position. Back it out and re-check the stack of panel, grommet, washer and bracket. The visible seam should settle progressively as several neighboring mounts are started loosely; one tight fastener should not be used to draw a whole panel across a gap.
Finally, inspect the front wheel through its steering range, screen and handlebar clearance, and any nearby hot or moving parts before riding. These are installation checks, not claims that a particular kit will interfere. If the bike was previously damaged, a qualified mechanic should assess structural or steering components independently of cosmetic bodywork.
A practical decision for a 2007/2008 borderline scooter
| What you know | Next step |
|---|---|
| VIN-derived model and bodywork both indicate the earlier generation | Review the 2001–2007 range and confirm the exact kit. |
| VIN-derived model and bodywork both indicate the redesigned 2008 generation | Review the 2008–2011 range and confirm the exact kit. |
| Registration year, VIN-derived model and visible bodywork do not agree | Do not guess. Send full-bike and close-up photos, model information and a description of prior repairs to the seller. |
| A panel fits in a photo, but the bike has nonstock brackets or lamps | Confirm the affected mounting points and required OEM pieces before production. |
The best order is not the one placed fastest. It is the one where the generation, existing hardware and photographed kit all describe the same scooter. If you are unsure, send NiceFairings a front, side and rear photo along with your confirmed model year and the product link you are considering. That gives the team a concrete fitment question to answer before paintwork begins.


