
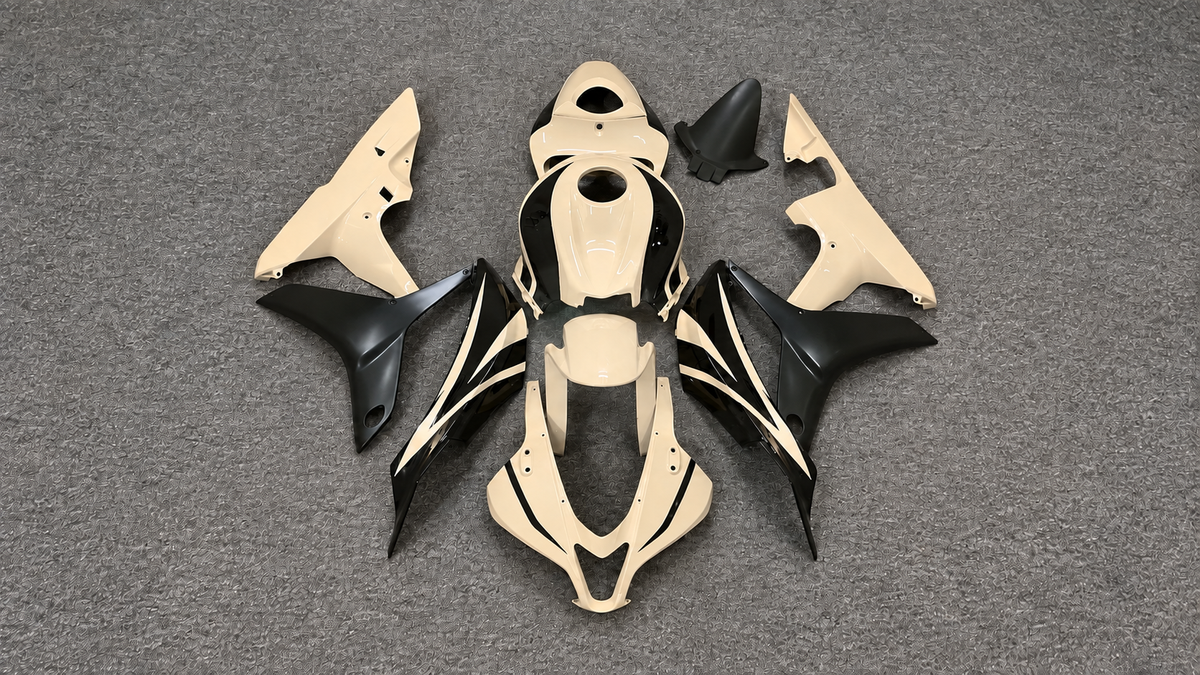
An older Honda CBR can look ready for new paint while its real bodywork problem remains hidden behind a side panel. A repaired tab, hardened grommet, wrong-length bolt or displaced heat shield can make a good-looking panel sit under stress. Replacing the visible plastic without recording those interfaces may transfer the same problem to the new part.
The useful question is not “How old is too old?” There is no universal age at which every fairing becomes unserviceable. The better question is: what does the evidence on this exact motorcycle say about repair, one-panel replacement or a coordinated set?
If you are still identifying the platform, begin with the Honda fairings collection, then narrow the search to the correct family such as CBR600RR fairings or CBR1000RR fairings. Do not choose from color alone.
Key Takeaways
- Confirm the exact model, model year and market before comparing panels.
- Inspect the inner surface, tabs, grommets, collars and supports—not only the painted face.
- Treat heat marks, forced gaps and repeated cracks as system clues, not automatic proof of a bad panel.
- A single panel can be sensible when damage is local and the retained finish can be accepted.
- A full set can simplify a visual reset, but it does not straighten brackets or replace unspecified hardware.
- Send NiceFairings a photo packet before ordering whenever the identity or mounting history is uncertain.
Start With Identity, Not the Existing Graphics
Record the VIN, registration model, model year and market information available for the motorcycle. Photograph the front, rear, both sides, headlight opening, windscreen, tail and major seams. A previous owner may have fitted replacement bodywork, so an HRC-inspired or Repsol-inspired appearance does not prove the underlying year group. Brand and sponsor marks may also require permission; discuss the design and intended use rather than assuming every reference can be reproduced.
For CBR600RR projects, compare your evidence with the CBR600RR year-by-year fitment guide. For an older Fireblade, the 2008–2011 versus 2012–2016 CBR1000RR guide explains why similar model names do not make panels interchangeable.
Build a Panel and Hardware Map
Before removal, take a locator photo of every fastener and place each removed item in a labeled tray or bag. Record the panel, position, fastener head, shoulder or collar, washer, rubber receiver and any spacer. Do not assume a mixed bolt set is correct merely because it held the old fairings in place.
With each panel supported on a padded surface, inspect:
- tab bases for a visible crack, whitening or an old bonded repair;
- holes for elongation, chipped edges or contact from an incorrect collar;
- molded pegs and slots for distortion;
- grommets for splitting, hardening or missing inserts;
- inner surfaces for rubbing, adhesive residue or heat discoloration;
- edges for forced overlap or paint crushed between panels.
The fairing fastener reuse-or-replace guide helps separate reusable hardware from items that need identification. A generic bolt kit is not proof that every shoulder, collar and rubber interface matches the motorcycle.
Inspect the Motorcycle With the Bodywork Relaxed
Look at accessible stays, side brackets, rubber receivers, wiring routes and heat protection without bending metal to match the panel. Compare left and right only where the parts are expected to be symmetrical. A harness trapped behind a bracket or a missing grommet can move a seam enough to look like molding error.
Heat evidence deserves its own record. Photograph softened material, bubbling, browned areas, missing reflective protection and polished witness marks near hot components. Do not infer a safe clearance from a photograph or copy a generic heat-shield layout. The motorcycle fairing heat-damage guide provides a cautious inspection framework; the service information and a qualified technician govern mechanical corrections.
Audit the Motorcycle in Six Zones
A fixed route helps prevent the obvious scratch from taking all the attention. Work around the stationary, cool motorcycle in the same order and keep observations separate from conclusions.
1. Windscreen, upper cowl and mirror interfaces
Look for a screen edge touching paint, a well nut sitting proud, cracks radiating from a mirror base, or a fastener stack that differs from the corresponding documented assembly. Turn the handlebars only as the motorcycle's correct procedure permits and observe cable, hose and control clearance. A cockpit noise may originate at the screen or inner trim rather than the painted upper cowl.
2. Headlight, intake and inner-panel area
Photograph gaps around the headlight and intake openings from straight ahead and both front quarters. Check whether inner pieces sit behind the painted edge as intended and whether wiring has been routed between a panel and its support. Do not pull a nose into shape with mirror bolts or use the headlight as a lever.
3. Left and right side-fairing interfaces
Follow every seam from top to bottom. Record whether a gap remains consistent, opens near one mounting point or changes when a neighboring fastener is relaxed. Inspect the hidden side of any damaged attachment. A repaired tab can remain serviceable, but its material, geometry and workmanship need assessment; paint on the visible side cannot establish that condition.
4. Lower fairing and hot-zone area
Keep the motorcycle cold while inspecting the belly pan and lower joins. Record shielding, brackets, polished contact marks and the route between plastic and exhaust components. If an aftermarket exhaust, header or belly pan is present, name it in the enquiry. A product that fits the original configuration may need a separate clearance decision after a modification.
5. Tank-cover and seat transition
Check whether the current panel rests naturally against rubber supports and whether its leading and trailing edges meet retained painted parts without being pulled. Photograph the tank color beside both side panels under the same light; this becomes useful if only one piece is replaced.
6. Tail, undertray and rear lighting
Look for missing clips, repaired lugs, wiring trapped near an edge and a tail section that sits differently left to right. Do not assume asymmetry proves damage—verify the actual component arrangement. If the tail or subframe may have been affected by an impact, obtain the appropriate technical inspection before treating it as a cosmetic alignment task.
Give Every Finding an Evidence Grade
Use a simple worksheet so a painter, technician and supplier can understand what you actually observed.
| Grade | Record | Next step |
|---|---|---|
| A — no visible concern | The photographed interface sits naturally with expected hardware present | Retain the photo as a baseline |
| B — cosmetic concern | Chip, scuff, fading or finish variation without a diagnosed attachment problem | Request a finish or repair assessment |
| C — fitment question | Uneven seam, stressed hole, unknown spacer, repeated rub mark or displaced edge | Relax the assembly and identify the first conflict |
| D — damage evidence | Visible crack, missing material, broken attachment, distortion or heat damage | Stop forcing the assembly and obtain the appropriate assessment |
These grades describe evidence; they do not certify strength or roadworthiness. A photograph may show a crack but cannot determine the complete repair method. A clean image may also miss a problem behind the panel.

NiceFairings product photograph from one specific 2007–2008 CBR600RR listing. It helps illustrate why inner and accessory pieces should be inventoried, but it is not a universal contents list. Confirm the actual items supplied with the referenced product.
Separate the Panel Problem From the Finish Problem
Two independent questions often become tangled. First: does the panel and its mounting system function as intended? Second: does the owner accept the color, gloss and graphic relationship?
A sound panel with faded paint may be a refinishing candidate. A glossy panel with a fractured attachment may need a structural repair assessment or replacement. A complete painted set can coordinate the supplied pieces, but the retained tank, fender, wheels and trim still influence the final appearance. Write those decisions on separate lines in the worksheet.
For a one-panel plan, photograph the damaged piece beside every retained color it touches. Ask whether the selected replacement is supplied painted, whether a design crosses the seam, and whether the owner accepts possible variation between new and aged finishes. For a full-set plan, mark which visible parts remain outside the set. Avoid promising a perfect match without a product-specific approval process.
Choose the Smallest Coherent Scope
Use three decision paths:
| Path | Appropriate evidence | Question to resolve |
|---|---|---|
| Repair assessment | Local damage on an otherwise complete panel | Can a qualified repairer restore the specific material and attachment area? |
| One-panel replacement | One identified panel is damaged and surrounding parts sit naturally | Is an acceptable color and graphic relationship possible? |
| Coordinated set | Several panels are damaged, mismatched or part of a planned visual reset | What exactly is included, retained and transferred? |
Do not compare only the purchase price. Include inspection, preparation, paint or graphic work, hardware, grommets, heat protection, shipping and professional labor where required. The cracked-fairing repair-or-replace guide provides a broader decision record without pretending that every crack has the same answer.
Compare Quotes on the Same Basis
A repair quote, a bare replacement panel and a painted complete set are not directly comparable until their scopes are normalized. Build rows for assessment, panel or repair work, surface preparation, paint, graphics, hardware, transfer items, heat protection, shipping, taxes or duties, professional installation and contingency. Mark every unpriced item as unknown rather than zero.
Also record time in a neutral way: supplier production estimate, transit estimate, painter availability and installation booking. Do not publish a universal installation duration. A clean, documented motorcycle and an unfamiliar used bike with mixed hardware do not present the same job.
Run a Pre-Order Pause
Before payment, ask another person to review the folder without relying on your memory. Can they identify the motorcycle, the affected panels, the retained parts and the proposed scope? Can they distinguish observed facts from assumptions? Are the product year range and the motorcycle year shown in the same document?
This small QC pause often finds a wrong-side panel, a missing modification note or an image that is too tight to locate. It also creates a clean handoff if NiceFairings asks for another angle.
Prepare a Useful NiceFairings Enquiry
When browsing the current NiceFairings catalog, save the collection and product URLs you are considering. Then send NiceFairings a concise packet containing:
- make, model, model year and market;
- full-bike photographs from four sides;
- the current panel layout and damaged areas;
- close-ups of tabs, openings and retained components;
- modifications such as exhaust, lighting, sliders or conversion parts;
- the desired scope: one panel, a complete appearance reset or a custom enquiry;
- questions about kit contents, transfer parts and production timing.
If the project needs a new layout, use the custom fairings page as the starting point and approve a model-specific visual brief. Review production and shipping information and the FAQ before committing.
Dry-Fit Without Using Fasteners as Pullers
Lay out and identify every supplied piece before installation. Transfer only the items confirmed for the assembly, keep all fasteners loose at first, and observe where the first natural conflict appears. A hole that aligns only when the panel is pushed hard is a reason to stop—not a reason to tighten harder or enlarge the hole.
The CBR600RR installation and alignment guide shows the loose-fit principle on a defined platform. Use the motorcycle's correct service information for torque, removal and safety procedures.
FAQ
Does an older CBR automatically need a complete fairing kit?
No. Age alone does not establish panel condition. Inspect the specific panels, mounting interfaces, supports and finish before choosing the scope.
Can I identify fitment from an HRC-style graphic?
No. Graphics can be applied to different generations. Confirm the motorcycle and panel geometry independently.
Will a new set fix uneven gaps?
Not if the first conflict is a bracket, retained component, incorrect hardware or assembly order. Diagnose the interface before forcing new plastic.
Should I promise a perfect color match to an aged tank?
No. Document the tank under neutral light and discuss whether the goal is a close relationship, a deliberate contrast or a coordinated repaint.
What should QC verify before this draft is published?
Confirm every collection handle remains live, avoid stating unverified kit contents, review trademark references, and add only product-specific claims supported by the actual listing or supplier record.
Can I reuse every fastener from the old bodywork?
Not automatically. Inspect and identify each fastener, collar, washer, clip and rubber receiver. Replace only with the correct type and dimensions for the documented assembly.
Does a complete painted set include every inner piece shown in an article image?
No image should be treated as a universal packing list. Confirm the exact product description and written order scope.



