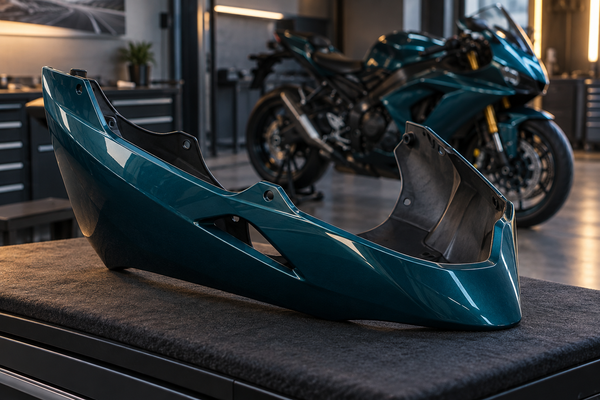
Shopping for ZX10R fairings for 2011–2015 versus 2016–2020 starts with the exact application, not a similar green paint scheme. Treat these as separate supplier-listed complete-kit groups unless the manufacturer explicitly confirms your particular order. This is an order-verification guide, not a claim that every individual component changed at the generation boundary. Confirm your model year, market and current bodywork configuration, then compare openings, supports and required hardware. The aim is a documented purchase decision rather than a visual guess.
Key Takeaways
-
Check your VIN to confirm your exact model year before you order fairings.
-
Check the mounting points, such as the headlight cutout and windscreen tabs, to see if they match.
-
Treat the two year ranges as separate complete-kit applications; verify individual components separately rather than assuming universal interchangeability.
-
Try fitting all panels together before you install them for good, and never push them hard to make them fit.
-
Ask the seller for real pictures and the exact model year the kit is made for.
-
Make sure you know the return policy before you paint or change any panels.
-
Check the interface details on your bike itself, not just the pictures in the listing.
ZX10R Fairings 2011-2015 vs 2016-2020: Begin with Model Year Verification
You cannot trust looks alone when shopping across these year ranges. Record the exact model year and market from reliable vehicle records and resolve any disagreement with Kawasaki or a qualified dealer. Then compare the chosen listing with the bodywork actually on your motorcycle. An earlier owner may have changed parts, so vehicle identity alone does not establish the current panel configuration.
Decoding the VIN
Locating the 17-Character Chassis Number
Find the 17-character chassis number stamped on your frame. You usually see it on the steering head tube, near the front of the bike. Your registration card and insurance papers also list this number. Write it down exactly. One wrong character sends you to the wrong model year.
Interpreting the 10th Digit
For a US-market vehicle, use the official NHTSA VIN decoder as one source of vehicle-identification information. Its results are manufacturer-reported. For other markets, or an unclear result, ask Kawasaki or the relevant vehicle authority. Do not apply a forum decoding table to every motorcycle.
Keep the decoded model information with the registration and manufacturer records. A VIN identifies the vehicle; it does not prove which fairings, lights or brackets are currently fitted. Resolve conflicting information before choosing an application.
Registration and Title Documents
Your registration and title carry the model year printed by the agency. Compare that year against your VIN reading. When the two match, you have solid confirmation. When they disagree, fix the conflict before you order anything.
Vehicle paperwork may not establish the original sales market or current equipment. Ask Kawasaki or a qualified dealer to resolve those details when necessary. A listing for a particular market or variant must be checked against the actual motorcycle, especially if lights or other supporting parts have been changed.
Official Kawasaki Parts Catalog Cross-Reference
The official 2016 Ninja ZX-10R ABS cowling-lowers catalog is a useful example of how Kawasaki distinguishes outer cowls, inner panels, brackets, dampers and hardware. Select the correct year, market and variant for your own bike; this particular diagram is not a reference for every ZX-10R.
Look up your bike in the catalog and note the panel part numbers. Then compare those numbers against what the seller lists. A full bodywork group for one model year may not carry the same numbers as another year. Individual components can have different application ranges. Never assume every panel interchanges within a year group. Treat 2011-2015 and 2016-2020 as separately listed complete-kit applications. This cross-check gives you a factual baseline before you spend money.

Understanding Model Generation Differences for Fairings
A year range on a supplier listing defines an application to investigate, not a complete engineering specification. Instead of assuming all chassis, subframe or intake parts changed together, compare the particular bodywork assemblies relevant to your order. This section identifies the supporting areas you should document before discussing a kit with the supplier.
Chassis and Subframe Design
Identify the supports used by the upper cowl, side panels and tail assembly on your motorcycle. Compare the correct Kawasaki parts diagrams and any approved installation documentation. This guide does not provide verified chassis dimensions or establish interchangeability from frame design. Do not modify structural parts to accommodate an incorrectly selected panel.
Photograph accessible panel supports and their connections without dismantling beyond your competence. Record non-stock brackets, damaged stays or missing inner trim. These details help distinguish a listing mismatch from an issue with the existing motorcycle. If damage is suspected, obtain a qualified assessment before ordering cosmetic panels.
Tail Section Structure
Checking the Actual Tail Assembly
Check the actual tail assembly rather than relying on a one-piece-versus-two-piece rule. Identify the outer tail panels, seat or seat cowl, undertray, rear lighting and mounting brackets separately. The number of painted pieces in a kit does not describe every component needed to complete that assembly.
Ask the supplier which original tail components must be retained and whether your current seat, latch, undertray and brackets are compatible with the listed panels. Compare part references and mounting-side photographs. A similar overall length or an attractive listing photo is not enough to establish a complete tail assembly match.
Intake Duct Positioning
Inspect the front-cowl intake opening and the ducts and supports behind it using the correct model documentation. Distinguish an intake duct from a cosmetic opening or a side-panel vent. This guide does not assert an unverified height, angle or location change between the two year groups.
Request images of the relevant panel opening and its inner interfaces. Check what duct, seal or trim is reused, supplied or purchased separately. If the listing does not explain this relationship, ask before paying rather than inferring compatibility from the paint scheme.
The useful outcome is a list of confirmed interfaces and unresolved questions for your exact motorcycle. Do not turn an unknown detail into a presumed generational difference. Match the order to verified application information and do not modify structural supports to fit an unconfirmed kit.
Comparing ZX-10R Fairings Exterior Interfaces
This section shows you what to inspect when you receive a set of panels. You compare the shape of each opening, the position of mounting tabs, and the location of hardware holes. These details confirm whether the panels match your bike. Do not trust the color or the overall silhouette alone. Check each interface one at a time.
Front Cowl and Windscreen Mounts
The front cowl determines how the bike looks from the front. It also controls how the windscreen and headlight attach. A mismatch here means the entire nose section will not fit.
Headlight Cutout Shape
Compare the actual headlight opening and the supporting parts around it. Do not identify these generations using a generic round-versus-projector rule. Use the correct Kawasaki diagram and clear pictures of the exact cowl offered by the seller, including its inner mounting side.
Compare photographs and accessible reference points first. If a careful trial comparison shows a different opening, record the discrepancy and ask the supplier to identify the cause. A mismatch could involve the selected panel, a variant, a previous modification or damaged supports; it does not automatically prove the panel belongs to the other generation.
Windscreen Tab Pattern
Confirm how the specified windscreen attaches to the upper cowl and which fasteners, washers or other mounting pieces are required. Do not assume a universal number of tabs or holes. Check the actual screen-and-cowl combination, particularly if retaining an aftermarket screen.
Ask for the intended windscreen application and clear mounting-area photographs. During a supported trial fit, follow the relevant instructions and protect both surfaces from scratches. Do not rest a screen face-down on painted bodywork or force misaligned fasteners. An unresolved mismatch needs supplier clarification.
Side Panel and Intake Connections
Side panels meet other bodywork and may surround openings or inner trim specific to the application. Identify the relevant lower joins and any duct or trim interfaces using the correct diagrams. Do not assume every visible side opening is part of the ram-air system.
Lower Fairing Joins
Check the mating edges, locating features and required hardware where each side panel meets the lower assembly. Compare the actual offered components rather than assuming all year groups use one type of hook or slot. Note which adjoining pieces are included in the same order.
Use a supported, documented trial fit when appropriate. Do not leave a loose panel hanging from one tab or push it until a seam closes. Uneven gaps can come from panel selection, hardware, assembly order, prior modifications or damaged supports. Record the issue and investigate rather than diagnosing the generation from the gap alone.
Air Duct Alignment
Check the actual intake assembly separately from side-panel vents and decorative cutouts. Confirm any required original ducts, seals and inner pieces with the appropriate parts diagram and supplier. A bodywork kit photograph may not show those concealed components.
Compare accessible opening shapes and neighboring components with the correct references. Photograph an unexplained gap or contact point and ask for guidance. Do not make performance claims from a photograph, and do not alter a duct or opening to make an unverified combination fit.

Tail Section and Hardware Points
Distinguish the cosmetic tail panels from the supports, seat latch, rear lighting and license-plate assembly. Confirm which parts belong to the kit and which remain on the motorcycle. Previous tail-tidy or seat changes are relevant details for the supplier.
Seat Mounting and Latch Placement
Verify the seat and latch assembly for your exact model and current configuration. Record the supporting parts and any prior changes. Do not assume this guide establishes a specific latch-location change between the two year ranges.
During the appropriate supported trial assembly, check the seat-to-bodywork relationship without forcing the latch. A seat must be correctly supported and securely retained according to the motorcycle instructions. Do not use the cosmetic panel alone as a seat-support test, and stop if the assembly is unresolved.
License Plate Bracket Position
Check the actual rear bracket, undertray and lighting arrangement, especially if a tail tidy has been installed. Record the required fasteners and clearances rather than assuming a two- or three-screw pattern. Do not drill the panel to solve an unexplained mismatch. Confirm the component application and applicable local requirements separately.
These checks create a useful record for the order. Their duration depends on the motorcycle and how much information is available. An incompatible interface is a reason to stop and investigate, not automatic proof that the whole kit belongs to the other generation.
Pre-Purchase Verification for Your Fairings
You now know how to compare interfaces on the bike. The next step happens before you pay. You compare what the seller lists against what your bike actually needs. This section walks you through that check.
Full Kit vs Individual Parts
Compare supplier-listed full bodywork groups first. A complete set for one year range gives you a single application to verify. Individual panels may carry broader application ranges. A single side panel might fit more than one model year. That does not mean every panel in the group interchanges. Treat the zx10r fairings 2011-2015 vs 2016-2020 groups as separately listed complete-kit applications. Ask the seller for a complete panel list. Confirm which pieces the full fairing kit includes. Some kits ship without the tank cover or the inner ducts. Others include hardware. Know what arrives before you commit.
Tab Layout and Opening Cutouts
Inspect the mounting tabs and hole patterns on the new panels. They must match your exact motorcycle and its supporting brackets. Use this checklist:
-
Confirm your model year through the VIN and match it to the year range on the product page.
-
Compare the windscreen outline, headlight openings, mirror positions, ram-air area, belly pan, and tail against your bike.
-
Ask for a complete panel and hardware list before you buy.
-
Inspect brackets and mounting tabs after any crash, since bent supports change how panels sit.
-
Save reference photos of cable routing, heat shields, and rubber pads for later comparison.
A tab or opening mismatch needs investigation. Verify the selected application, adjoining parts, hardware and condition of the motorcycle before deciding what caused it.
Paint Mask Compatibility and Graphic Alignment
Paint masks and graphics should be planned for the exact panels being supplied. Use a custom fairing design brief to request a layout showing how stripes cross the actual panel joins, and confirm which decals are included. Do not assume a graphic set will follow another panel design simply because both are advertised for ZX-10R motorcycles.

Seller Communication and Photo Verification
Ask the seller direct questions before you order. Request the exact model year and market the kit targets. Ask whether the listing assumes a stock or modified configuration. Confirm the number of panels included. Find out whether clips and grommets come with the kit or transfer from your old fairings. Get the written product application in the listing or in a message.
Requesting Useful Bodywork Photos
Request clear photographs of the actual upper cowl, side panels, tail and inner mounting areas relevant to your order. The objective is sufficient detail, not a fixed photo count. Product identification matters more than a stylized cover image.
Limits of AI Mockups and Product Images
A product photo does not prove fitment. An AI mockup does not prove fitment either. Both can show a clean silhouette while hiding a wrong tab pattern. Neither image confirms the panel matches your model year. Use photos as a starting point only. Your VIN check and interface comparison remain the real test. Even with good photos and a correct VIN, fitment is not guaranteed until you dry-fit the panels.
Dry-Fit Procedure Before Final Installation
A dry-fit is a supported preliminary assembly following the relevant model and supplier instructions. It helps reveal alignment issues before irreversible finishing or final tightening. It is not permission to ride with loose panels, nor a guarantee that a visual check alone establishes every clearance and attachment requirement.
Layout and Visual Inspection
Lay out every panel in the kit before you touch the bike. Match each piece to its location on your motorcycle. Check the overall shape against your stock fairings. Look at the headlight opening, the windscreen area, and the tail section. These visual checks confirm the kit matches your bike's generation.
Use only the support and temporary retention specified for the trial-fit procedure; do not balance unsecured panels on the motorcycle. Protect adjoining surfaces and check the relevant seams systematically. If the procedure or required supports are unclear, have a qualified technician carry it out.
Hardware Transfer and Grommets
Your original hardware often transfers to the new panels. Remove the grommets, clips, and rubber cushions from your stock fairings. Inspect each piece for wear or damage. Replace any part that looks cracked or loose. A worn grommet will not hold the panel securely.
Install the hardware into the new panels by hand. Do not force any clip into a hole that seems too small. A clip that does not seat easily signals a mismatch. Check that every mounting tab lines up with its corresponding hole on the bike. If a tab sits far from its target, the panel belongs to the wrong application. Stop and consult the seller before you proceed.
Clearance Checks and No-Force Rule
Check the required clearances using the correct instructions and a safely supported motorcycle. Static appearance alone does not establish clearance through steering or suspension movement. Do not invent a minimum gap or adjust panels arbitrarily to clear a contact point. Stop and consult the supplier or a qualified technician when the cause is unclear.
Never heat, drill, or force a panel into place. Do not use arbitrary shims to fill gaps. Omitting the dry-fit step can result in crooked panels and uneven gaps that ruin the factory look. If the panels do not align, do not proceed with installation. Consult the seller or a qualified inspector for damaged brackets. A bent support changes how every panel sits. The dry-fit is your final confirmation of fitment. Treat any misalignment as a signal to stop and verify.

Questions to Ask When Ordering ZX-10R Fairings
Before you pay, ask the seller a clear set of questions. These questions help you avoid buying a kit for the wrong model group. They also tell you what comes in the box and what you need to get yourself.
Model Year and Market Confirmation
Start with the exact model year and market. Ask the seller if the kit fits a US or European model. The same model year can have different parts in different markets. That changes how panels attach and what openings they have.
Ask if the listing is for a stock or modified bike. A bike with a custom exhaust or tail tidy may need different panel space. Check how many panels come with the kit. Some kits do not include the tank cover or inner ducts. Others include screws, rubber strips, or wire grommets. Get the written product details from the listing or a message. That record helps you compare the kit to your bike's real needs.
Requesting Real Photos and VIN Data
Ask for clear, genuine photographs of the bodywork being sold, particularly the interfaces you need to verify. Explain any non-stock parts on your motorcycle so the supplier can address the actual configuration rather than only a broad year range.
A product photo does not prove the kit fits. An AI mockup also does not prove fit. Both can show a nice shape but hide a wrong tab layout. Neither image shows if the panel matches your model year. Even with good photos and a correct VIN, you cannot be sure until you dry-fit the parts. Your VIN check and interface check are the real test. Only use photos as a first step.
Understanding Return Policies
Read the store FAQ and the actual return, warranty and shipping terms before ordering. Ask what procedures apply to a fitment concern and whether modification, painting or installation affects the options available. This guide does not set a restocking-fee limit or provide legal advice. Keep the listing and relevant correspondence with the order record.
Ask for an itemized description, clear application information and a practical process for resolving an incorrect or damaged item. Price alone does not establish plastic thickness, fit or manufacturing quality. No unsupported price threshold or unverified certification should replace checking the specific product.
The practical rule is to match the complete order to your exact motorcycle and its current configuration. Treat 2011–2015 and 2016–2020 as separate supplier-listed kit applications unless expressly confirmed otherwise. Check individual components independently, document unknowns and resolve them before payment or irreversible work. Vehicle records, official diagrams, supplier information and a careful supported trial fit have different roles; use them together rather than treating any one as a universal guarantee.
FAQ
How do I confirm my ZX-10R model year before ordering fairings?
Use reliable vehicle-identification records, the appropriate manufacturer or government decoder for your market, and the correct Kawasaki parts catalog. Resolve any disagreement with Kawasaki or a qualified dealer before ordering. Also document previous bodywork changes.
Can I install 2016-2020 fairings on a 2011-2015 ZX-10R?
Do not order a complete kit listed for the other year group on the assumption that it will bolt on. Obtain explicit confirmation for your exact motorcycle and required supporting parts. This guide does not establish a cross-generation conversion or claim that every individual component has a different application.
What should I compare when checking fairing compatibility?
Compare the headlight cutout shape, windscreen tab pattern, side-to-lower fairing joins, air duct alignment, seat latch placement, and license plate bracket position. These connection points show a wrong generation fast. Hold new panels against your bike and check each connection point with your own eyes.
Do product photos prove the fairings will fit my bike?
No. Clear actual-product photos help with identification, but neither a photograph nor an AI illustration proves complete fitment. Check the written application, relevant part references and actual motorcycle. Resolve uncertainties before ordering and follow the appropriate supported trial-fit procedure.
What questions should I ask the seller before buying?
Ask for the exact model year and market the kit is made for. Confirm whether it fits a stock or modified bike. Ask for the full panel list and hardware details. Get the written product application. Ask about the return policy before you modify, paint, or drill anything.
What is a dry-fit and why does it matter?
A dry-fit is a supported preliminary assembly under the correct instructions before final tightening or irreversible work. Do not leave panels unsecured or ride in this state. If something does not align, stop and ask the seller or a qualified technician rather than forcing, heating or drilling it.
Can individual fairing parts fit multiple model years?
Single parts may fit a wider range of years than full kits. One side panel might fit more than one model year. But this does not mean every panel swaps within a year group. Always check the exact part against your bike's setup and the seller's written application.
What if my fairings arrive and do not align during dry-fit?
Stop installation right away. Do not drill, heat, or force panels. Check for damaged brackets or bent supports on your bike. Send the seller photos of the misalignment and ask for help. A qualified inspector can tell you whether the problem is the fairings or your bike's mounting points.